Tag Archives: Express Tools

Adding Express Tools to BricsCAD

If you’re evaluating BricsCAD to replace AutoCAD, you might be put off by the apparent absence of the Express Tools. Don’t be.

First, some express tool commands have been added to BricsCAD as native commands, such as OVERKILL and TXTEXP.

Next, the Express Tools menu can be added, thanks to a free add-on by Martin Drese (CADwiesel). Here’s the step-by-step process:

  1. Go to the Bricsys Applications page.
  2. Start typing “EXPRESS” into the search box. You should be pleasantly surprised to discover that by the time you’ve typed four characters, what you are chasing will already be displayed for you:
     
  3. Click on the Express Tools box, turn on the checkbox and then pick Download.
  4. If you’re not already signed in with your Bricsys ID at this time, you’ll be prompted to do so. You should have created this ID when you downloaded the main product.
  5. The download (a straightforward one; no nasty download managers involved) is a 3.6 MB zip file. Unzip this to a location of your choice.
  6. As described in the file Install Notes Express Tools for Bricscad V18.pdf, copy the Express folder to the BricsCAD installation folder (e.g. C:\Program Files\Bricsys\BricsCAD V18 en_US). You’ll need admin access for this step.
  7. Add that location (e.g. C:\Program Files\Bricsys\BricsCAD V18 en_US\Express)to the BricsCAD search path (Settings > Program Options > Files > Support files search path).
  8. If you already have a file called on_doc_load.lsp in your search path (this is the equivalent of acaddoc.lsp), then add this line to it:

    (load “Acetutil.des”)

    If that file doesn’t already exist, you can just copy the one from the unzipped location to anywhere in your search path (e.g. the path you just added – C:\Program Files\Bricsys\BricsCAD V18 en_US\Express).

  9. Close and restart BricsCAD.

This is more involved than your typical AutoCAD app store installation, but as a CAD Manager I do like the fact that these are straightforward steps that I can automate in a custom environment such that the users have no need to get involved.

The end result is a Pull-down menu (if you have that turned on – MENUBAR 1 if you don’t) that will be familiar to you:

There are also four toolbar menus:

If you’re using a ribbon and don’t want to see toolbars, substantial manual effort is required to add Express Tools to the ribbon interface. If you are interested in me doing a further post explaining how this is done, please add your comments to this post.

Most of these tools will work with all BricsCAD variants. Some of them require OpenDCL support which is not available in the Classic version, so you’ll need a minimum of BricsCAD Pro (that’s the second level) for complete functionality.

It’s worth noting that the various API LISP functions (acet-xxxx) that are added to AutoCAD by the Express Tools are also there in BricsCAD. Unlike AutoCAD, they are native functions; they can be relied on to be there in BricsCAD, regardless of whether or not the Express Tools add-on is installed as described in this post.

Also unlike AutoCAD, the functions are supported. If there are any problems, you can report them (with, in my experience, a reasonable expectation of them being fixed in a short timeframe by Torsten Moses), rather than being fobbed off by an uninterested Autodesk.

If you go back to step 2 above, see the box that says LISP Developer Support Package (LDSP)? If you code in LISP (with or without BricsCAD), I suggest you download that package. Among many other things, it documents the acet-xxx functions.

Edit: I should point out that R.K. McSwain covered much of this ground earlier this year.
The best thing about AutoCAD 2017.1 is…

…the fact that one of the Express Tools finally got an update. Not just a minor maintenance tickle or mere absorption into the core code, either. A real update, resulting in not only bug fixes but genuinely useful improvements in functionality.

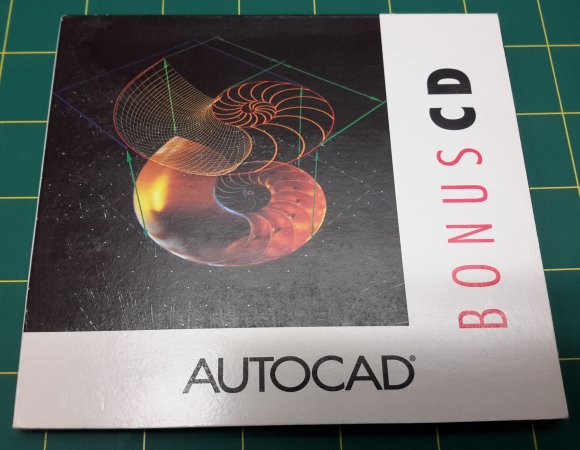
A little background on Express Tools might help put this into context. The history goes back to 1992 and AutoCAD Release 12. In addition to an impressively full set of paper manuals, people with Release 12 (great value at US$500 to upgrade from any earlier release) obtained a Bonus CD containing 2605 files of free add-on goodness. Fonts, LISP, DOS and Unix utilities, sample drawings, demos, all sorts of stuff. Remember that just popping on the web to grab that sort of thing wasn’t really an option at the time, so this CD was quite a big deal.

autocadrelease12bonuscdcase

Release 13 didn’t have an equivalent CD (although it had many other things – most of them bugs), but with Release 14 in 1997 there was a concerted effort to add extra value. A program was put in place to produce a set of bonus stuff, partially developed by external parties. Unlike the Release 12 material, the Release 14 Bonus Tools were (kind of) incorporated into the main product, although they remained unsupported:

Although we put a great deal of effort into making sure the Bonus Tools are free of problems, they are not officially supported by Autodesk. We do not guarantee that the results are 100% error free.
 
To use the bonus tools, choose the Full installation option or select Bonus and Batch Plotting during a custom installation. The installation program places the bonus files in the BONUS\CADTOOLS directory and puts that directory in the Support File Search Path. The installation program also appends your ACADR14.LSP and ACAD.MNL files to ensure the proper loading of the bonus support file AC_BONUS.LSP and menu file AC_BONUS.MNU.

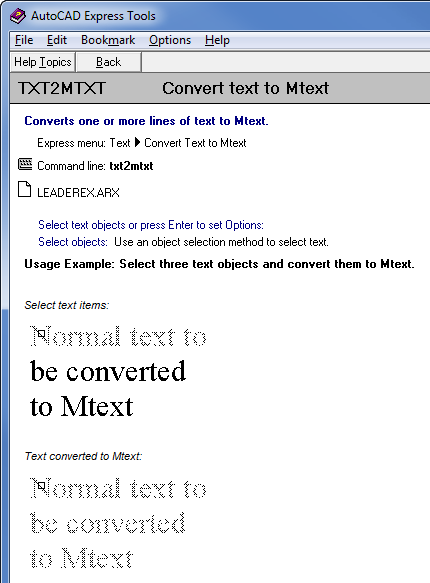
A lot of the things we now take for granted in AutoCAD were born as a result of this initiative. With AutoCAD 2000, Bonus Tools were renamed as Express Tools and some R14 Bonus Tools were removed while others were added to the core product. Several more features were added to an already handy collection, including TXT2MTXT:

autocad2000txt2mtxthelp

The history of Express Tools has been less illustrious since that high point. Autodesk made an ill-advised attempt to make money from them by removing them from AutoCAD 2000i and 2002 and first of all making them available only to VIP/Subscription (now called maintenance) customers as a carrot, then offering them for sale as AutoCAD Express Tools, Vol 1-9. That little business venture was always doomed to fail, and you can still find many sets of instructions allowing people with AutoCAD 2000 to carry across their Express Tools to 2000i and 2002.

Since then, other than some commands being absorbed into the core, it has been “maintenance mode” for Express Tools. This means the code just gets recompiled when necessary and very little actual maintenance goes on. As a result, some 20th Century bugs live on to this day.

Enough history! So what is this best thing? As a byproduct of improvements to PDFImport, the TXT2MTXT command was redone. Not much about this gets mentioned in the readme, but a whole bunch of very good things happened to this seemingly simple command (main source AutoCAD 2017.1 Preview Guide):

  • You can select Mtext objects in addition to Text objects.
  • A Settings option on the Command line displays the Text to MText Settings dialog. In the past you had to press Enter at the start of the command to see the dialog box.
  • Character codes translate correctly between Text and Mtext (e.g. text underlining appeared as %%U when converted to Mtext).
  • The “Select objects” prompt adheres to standard error checking and messaging. For example, objects on locked layers are filtered from the selection set.
  • Justification (Top left, Top center, Top right) is inferred for the Mtext object being created based on the positioning of the text objects in the drawing instead of always using Top left justification. When no justification can be logically inferred, it defaults to top-left.
  • Numbered and lettered list formatting is inferred when the word-wrap text box is checked. If a line starts with one or two characters followed by a period and up to 10 spaces, list formatting will be applied automatically.
  • The top-down sorting order is relative to the current UCS and sorting is left-to-right when text objects are collinear. When multiple text objects are collinear, they are treated as if on the same line with a space between them.
  • A new Settings option enables you to force uniform line spacing or maintain existing line spacing.
  • Various bugs are fixed that caused unexpected results when in a non-WCS UCS.
  • An option was added to the Settings dialog box to not combine selection into a single mtext objects (converts text object to mtext without combining).

That last item alone could be a huge time-saver. If you need to convert 100 text items to mtext (e.g. for background masking reasons), you can now use the command once rather than 100 times. Sure, there are LISP routines to do this (I’ve written some myself), but incorporating it into the core product makes things easier for large numbers of people.

It would not be a bad idea for Autodesk to go through all of the Express Tools looking for similar bug fixes and improvement opportunities. Instead of occasional ad-hoc drip-by-drip adoption of an Express Tool or two into the core, I propose that a special project be undertaken to go through the whole lot, fixing and improving them all. Once done, add them all to the supported functionality of the product, along with any related functionality that makes itself apparent during the overhaul.

Such a project strikes me as something relatively easy to do that would go down very well among customers. Or how about some totally new stuff? Express Tools 2018 – The Next Generation?

AutoCAD 2012 – How to “hatch” using any objects

Here’s a trick you can use in AutoCAD 2012 to fill an area with any objects you like. It’s not actually hatching, but it has several advantages over the real thing:

  • You aren’t restricted to straight line segments as you are with real hatching. Circles, splines, even solid objects, you name it, you can use it.
  • To define the pattern, you don’t have to master an arcane file format or use trigonometry to work out the numbers used in it. Just draw the objects you want repeated.
  • You can easily change the spacing between the objects later, or even change the objects themselves.

How is this done? Use the new associative array feature, then use XClip to restrict the displayed objects to within a specified boundary. For example, let’s say you have a polyline you want filled with green spheres, and a green sphere already drawn. The sequence is:

  • Use the Array command to create a rectangular array of spheres that more than covers the whole area you want “hatched”. You might prefer to use my ClassicArray add-on for this, but it will make no difference to the finished objects.
  • Use the XClip command and select the array of spheres. Press Enter to accept the default option of New. Type S [Enter] to select the polyline, then pick the polyline. Done!

Don’t have a handy polyline defining the area? No problem, just create one before you start using the Boundary command.

There are some restrictions to this technique that do not apply to normal hatching. For example, any arc segments in the polyline will be treated as if they were straight lines, which isn’t very useful. But this method will work in most cases, and it sure beats spending hours trying to get your hatch pattern definition just right. You can even use an array of arrays to get some very interesting effects. For example, you could have a series of circles in a wave-form path array, which is then arrayed in a rectangular form before being Xclipped.

Not using AutoCAD 2012? You can do something similar using Minsert. Instead of Array, use the Block command to convert your objects to a block, then the Minsert command to insert it in a series of array-like rows and columns. Finally, Xclip it as described above.

Edit: In a comment, Patrick Emin reminded me of the Express Tools command SuperHatch. This allows you to use an image, block, xref, or wipeout object as a hatch pattern. It also automatically takes care of various details, including converting arcs within the boundary to straight line segments. However, the end result can be hundreds of individual blocks collated into a group, rather than just one configurable object if you use the Array or Minsert methods I describe above.

Filling the holes in Autodesk’s CHM Help stopgap

It was good to see Autodesk react to criticism of AutoCAD 2011’s browser-based Help with an acknowledgement of the problems and an attempt to provide a workaround by making a zip file of CHM files available for download. That’s much better than ignoring people’s concerns, denying the validity of those concerns or shooting the messenger, which has been known to happen in the past.

However, there are some holes in the workaround, only some of which can be filled.

  • Under 64-bit Windows 7, the Search pane is blank, as it is in the CHM Help for earlier releases on that platform. This is stated on the download page. Index works well, but Search doesn’t. As Search is one of the worst aspects of the browser-based Help, this is a rather unfortunate.
  • There is no obvious way of making the CHMs provide contextual help. Don’t bother pointing at acad181.chm in the Files tab of Options, it doesn’t work. Edit: See Chris Cowgill’s post on the AUGI forums for a partial workaround.
  • Even without contextual help, no advice is provided for calling the CHMs from within AutoCAD; you are only told that you can set up a shortcut on your desktop and double-click on that when you need it. However, you can set up an alias command in AutoCAD. To do this, edit the acad.pgp file or use the Express Tools Aliasedit command to set up a shell command. The alias name can be whatever you like (e.g. HEL), the command name should simply be the path and filename of the main acad181.chm file.
  • The CHM files are currently available only in English.
  • The set of CHM files is incomplete. See below for more details and what you can do about it.

These are the CHM files provided with AutoCAD 2011:

acet.chm – Express Tools
AdRefMan.chm – Autodesk Reference Manager
adrefmanctxt.chm – Not to be launched manually
ole_err.chm – Not to be launched manually
webbrw.chm – Not to be launched manually

These are the CHM files provided in the zip file download:

acad181.chm – Main AutoCAD 2011 Help file
acad.readme.chm – Readme
acad_acg.chm – Customization Guide
acad_acr.chm – Command Reference
acad_aug.chm – User’s Guide
acad_dpg.chm – Driver and Peripheral Guide
acad_install.chm – Installation
acad_nfw.chm – New Features Workshop
adsk_lic.chm – Licensing

These are the CHM files that are missing:

acad_aag.chm – ActiveX and VBA Developer’s Guide
acad_alg.chm – AutoLISP Developer’s Guide
acad_alr.chm – AutoLISP Functions
acad_alt.chm – AutoLISP Tutorial
acad_car.chm – Connectivity Automation Reference
acad_dev181.chm – Developer Documentation
acad_dxf.chm – DXF Reference
acad_sso.chm – Sheet Set Objects Reference
acadauto.chm – ActiveX and VBA Reference
adsk_brw.chm – Licensing – (this appears to be a later version of adsk_lic.chm).

Do you need any of the above? I did. To obtain a full set of AutoCAD 2011 CHM files, I had to do the following:

  1. Download a vertical AutoCAD 2011-based variant. I used AutoCAD Civil 3D 2011, because I am entitled to download that from the Subscription Center. You may need to download an evaluation copy of a vertical. If so, make sure you delete the files after your evaluation period of 30 days, won’t you? Hopefully, Autodesk will have provided a better workaround by then.
  2. Double-click on the downloaded executable (which is actually a self-extracting archive). You will be prompted for a location for the files to be unzipped to. I accepted the default of C:\Autodesk\AutoCAD_Civil3D_2011_English_32bit.
  3. After the unzipping process is complete, the installtion window will appear. Pick Exit; you do not need to go ahead with the whole installation.
  4. Search for the CHM files in the unzip location. There are a variety of locations, some of them containing duplicate files, but I was able to find what I needed in C:\Autodesk\AutoCAD_Civil3D_2011_English_32bit\x86\en-US\C3D\Acad\Help.
  5. Copy the files from here to a safe location, and set up shortcuts and/or alias commands to access them.

Note that I can’t vouch for the completeness or correctness of these files (which may be why Autodesk didn’t include them), but I can’t do that for the HTML versions either. For those of you in non-English-speaking locations, I would be interested in finding out if you can use this method to obtain non-English CHM files. Are there non-English AutoCAD 2011-based verticals available for download yet? If so, are the CHMs in your language?

Finally, if you are having trouble reading CHMs over a network, check out this Microsoft document on a security update that may be the cause.

AutoCAD 2009 – Ribbon content for Express Tools

One of the many unfinished aspects of the AutoCAD 2009 Ribbon is the lack of Express Tools content. One enterprising user has put the effort into correcting this, and has posted an Express Tools CUI replacement in this Autodesk newsgroup thread. I have not tested this myself. As usual with CUI, be paranoid. Back up everything before you touch anything.

While I wouldn’t normally suggest you do any Ribbon custom work in 2009 in its current state, it shouldn’t hurt in this case as it should be easily redoable once Autodesk has fixed up the worst of the 2009 CUI problems. Anything else you do should be considered as disposable. The problems with 2009’s CUI are so fundamental that it is quite likely a restructure will be required to fix them, either in a service pack or in 2010. That means your 2009 CUI efforts may need to be redone, just like your AutoCAD 2008 Dashboard modifications.