Tag Archives: Development

DOSLib goes open source

What’s DOSLib?

DOSLib is a free library of LISP functions that adds a lot of functionality to AutoLISP/Visual LISP/BricsCAD LISP. It makes a lot of programming tasks a lot easier, because instead of writing a bunch of code to do tricky stuff, you can just load the library and call a ready-made (dos_xxx) function. There are hundreds of functions that cover the following areas (taken from the McNeel Wiki):

  • Drives – Check for drives, change between drives, and check available disk space.
  • Paths – Manipulate path specifications.
  • Folders – Create, rename, remove, select, and change folders. Return special operating system folders.
  • Files – Copy, delete, move, rename, and select files; get directory listings, search and find multiple instances of files, and change file attributes.
  • Print – Get and set default printers, and spool print files.
  • Configuration – Manipulate Windows-style initialization (INI) files, and access the Windows Registry.
  • Processes – Run operating system commands or other programs.
  • Interface – Get strings, integers, reals, and lists from the user. Display Windows message boxes, progress meters, and splash screens.
  • Strings – Tokenize strings, extract characters, find characters, insert, remove, and replace characters, and trim characters.
  • Math – Trigonometric calculations, vector manipulation, statistical analysis, and more.
  • CAD – Save all and close all open files. Preview drawings and list xrefs.
  • System – Get system information, sort lists, change the system date and time, manipulate the keyboard, and play sounds.

Why would a CAD LISP programmer use it?

There are many DOSLib functions that would be difficult to write purely in LISP and quite a few that would be impossible. So for those people who want to code for AutoCAD and BricsCAD without the bother of learning ARX/BRX and dealing with the associated compiler requirements, DOSLib has been a godsend. It’s worth noting that some of the DOSLib functions have been added to BricsCAD’s LISP engine, so depending on the function you use, you may not even need to load the DOSLib library.

Do impressive-looking stuff without writing much code. You might call it being lazy. I call it being efficient.

A history of dependability

DOSLib has been around for many years. It is currently supported on AutoCAD 2013 and later and BricsCAD Pro V13 and later, but earlier versions have supported AutoCAD releases dating back to 1992! Dale Fugier at Robert McNeel and Associates has been providing outstanding service in developing DOSLib and keeping it up to date. For nothing!

So developers have been able to take advantage of the DOSLib functionality all that time, and Dale has always come up with the goods in terms of updates to work on new releases of AutoCAD and BricsCAD. However, you may have had a nagging doubt about writing code that relies on a third party, or as a CAD Manager relying on such code, no matter how rock-solid reliable that party has proven in the past.

That nagging doubt can now be put to bed, because Dale has announced that DOSLib has been made open source under the very open and simple MIT license. The GitHub DOSLib page has the source, with compilation and other relevant information.

All good news

Dale has also stated that he intends to continue to provide compiled binaries for the foreseeable future, so don’t worry about having to mess with compilers. Even if a meteor happens to land on McNeel headquarters, it’s a pretty safe bet that somebody in the AutoCAD/BricsCAD development community will, after a suitable period of mourning, step forward to compile the code for new AutoCAD/BricsCAD releases when required.

The availability of the source code also opens the door for DWG-based applications (other than BricsCAD) to attempt to provide a higher level of LISP compatibility, to the extent of supporting (dos_xxx) function calls. That means you, the CAD LISP programmer, will have a wider potential audience for any code you write that uses DOSLib functions.

Finally, if you’re an ARX/BRX developer who wants to do something similar to something in a DOSLib function, you now have some handy sample code.

So this is all good news, and yet another example of Dale and McNeel doing the right thing by the CAD community.

Mac users rejoice – at long last, a LISP IDE comes to OS X

CAD’s best LISP development environment has come to the best “AutoCAD for Mac”. It should come as no surprise to anyone that this has occurred without Autodesk’s involvement.

What’s happened?

With the release of BricsCAD (Mac) V18.2 (currently V18.2.23-1 to be precise), BLADE (BricsCAD’s much-superior equivalent to VLIDE) has been added to BricsCAD

See here for the release notes and here to download. Make sure you select the Mac version:

Significance

This is pretty significant for anybody serious about using DWG-based CAD on the Mac. AutoCAD without LISP is hardly worthy of the name, which is why I’ve never been keen on AutoCAD LT from the moment LISP was yanked out of it just before release in the early 90s. There has never been an integrated development environment for AutoCAD for Mac (either in the first iteration in the 1990s or the second attempt in the 2010s) and I think I can safely predict that there’s never going to be one. I expect AutoCAD for Mac’s LISP to remain forever in 1990 mode.

Compatibility

One problem a small number of users may face when developing for Mac with BLADE is that of downward compatibility. In case you’re wondering, BricsCAD (Mac) to AutoCAD for Mac is very much a downward direction, particularly in the area of LISP. The LISP in AutoCAD for Mac is famously half-baked with large portions of functionality missing, including no ability to control dialog boxes. BricsCAD (Mac)’s LISP is very much more capable, so while compatibility between AutoCAD for Windows and BricsCAD (Mac) is strong, you can’t say the same for LISP compatibility between AutoCAD for Windows and AutoCAD for Mac.

Half of the stuff you write for AutoCAD in Windows is just going to fail when you try to run it in AutoCAD for Mac. Much more of it is going to work in BricsCAD (Mac). While you can now write, debug and run your LISP code efficiently in BricsCAD (Mac) and it’s practically guaranteed to run just fine in AutoCAD and BricsCAD for Windows, it will be very easy to write stuff in BricsCAD (Mac) that doesn’t work in AutoCAD for Mac. Of course, the same downward compatibility problem applies to writing stuff in AutoCAD for Windows using VLIDE.

If you’ve moved on completely from AutoCAD for Mac to BricsCAD (Mac), that’s not going to be a problem. Bircsys building a notably better product that’s significantly more compatible with the main game is not something anybody could reasonably condemn. However, but it’s something to bear in mind if you are hoping to write code that runs on both AutoCAD and BricsCAD for Mac.

Summary

That caveat aside, it’s all good news for Mac CAD users. You already had a product available that would run a much higher percentage of the huge library of LISP out there than AutoCAD for Mac would. For the first time in history, you now also have access to a professional LISP development tool. Lucky for you, it’s the best such tool on the market.

Steve’s BLADE presentation at the BricsCAD New Zealand and Australia Roadshow

Sofoco (Australia) and CAD Concepts (New Zealand) recently ran a series of seminars throughout Australasia demonstrating BricsCAD. I attended the last of these in Brisbane on April 19 and gave a presentation about BricsCAD’s LISP, with reference to AutoCAD compatibility and the tools available to CAD Managers and developers, including BLADE. The talk was aimed at anybody who is writing or maintaining LISP code for AutoCAD or BricsCAD.

I had the just-before-lunch slot, which is never desirable for a presenter. People are dozing off and/or bursting to go to the toilet, and time adjustments have to be made if earlier presentations run over. I started 10 minutes late and therefore had to remove the demonstration part of the presentation on the fly, but I had planned to allow for that eventuality. It’s been a while since I have presented like this before an audience so I was a bit rusty and it wasn’t as free-flowing as I would have liked. Too many ‘erms’!

Steve’s invisible accordion is impressively large

I did manage to keep the whole audience in their seats until the end, though, so that’s something. Maybe the fact that I was waving a sword around had something to do with it.

Here’s my video, which is 21 minutes long. The sound is a bit muffled and my accent is Australian, so you might want to turn on subtitles using the CC option in the YouTube player.

Disclosure: the organisers covered part of my expenses.

BLADE – putting things back to “normal”

Disclaimer: I’m making money using BLADE. I’m using it on a paying project right now (well, not while I’m typing this, but you get the idea). I’m developing a routine to automate a massively repetitive task for one of my AutoCAD-using clients, and I’m developing it in BricsCAD and BLADE rather than AutoCAD and VLIDE.

I can simply develop faster in the more modern environment, and BricsCAD’s significantly quicker start-up time helps with that. So does the fact that the routine runs several times faster in BricsCAD, making testing the large data sets much more efficient. I’m getting paid on results and not by the hour, so using BLADE is putting cash straight into my pocket while giving me more time to walk my dog.

Using BLADE in production, I’m discovering a few bugs, quirks and things I don’t like. That’s totally understandable with a new feature of this level of complexity and functionality. Where I think it makes sense, I’m submitting problem reports or feature requests to Bricsys. I’m sure Bricsys already has a bunch of these from other developers, so they’ll be very busy for a while. From past experience, I know my reports will be taken seriously and acted on appropriately in a timely manner, if it’s feasible to do so. Your LISP IDE feedback won’t be ignored for decades by Bricsys.

One of the things Torsten Moses mentioned to me that didn’t make it into the published interview was that many developers are very conservative. There’s some truth in that. I’m missing certain keystrokes, for example: 1978-era WordStar Ctrl-Y to delete a line, anyone? It’s a reasonable expectation that as more VLIDE users migrate to BLADE, many requests will come in for VLIDE-like things. I’m told that some of these things will be provided in coming months.

In the meantime, there are things we conservative developers can do to make ourselves feel more at home. One of these is to configure the editor appearance. Here’s the VLIDE editor:

Here’s the BLADE equivalent:

One of the great things about BLADE is how configurable it is, and I know Torsten’s working right now on making it even more so. Configurations are stored in the Registry in a version-independent location (HKCU\Software\Bricsys\BricsCAD\VLispDbgEditor). These can be exported and imported directly or via BLADE, so multiple complete setups and configurations can be managed.

In this post, I’m going to be going through the process of configuring BLADE’s editor appearance to make it look more like VLIDE. I’m not suggesting that’s necessary or even a good idea in most cases, but if you really want to do it, here’s how.

Note: before you do all this manually, please note that at the end of this post I will provide a configuration file that will do it for you.

  1. Start up BricsCAD V18.2 or later and start BLADE using either the BLADE or VLIDE command.
  2. Open a LISP file in BLADE so you can check the effects of the changes we’re going to make.
  3. Use Preferences > Show preference dialog…
  4. In the Preferences & Settings dialog, pick the Styles tab and the Lexer Styles sub-tab.
  5. I’m perfectly happy with Courier New 10, but if you want the VLIDE look, change 1 – Default text to Fixedsys 11.
  6. Click next to 3 – Comment, turn on the Background color toggle and change the Back Color to mid-grey (192,192,192) and Fore Color to dark magenta (128,0,128). You’ll need to specify that RGB value in the lower right corner and use Add to Custom Colors to do this.
  7. Click next to 5 – String and change the Fore Color to magenta (255,0,255).
  8. Click next to 7 – Operator and change the Fore Color to red (255,0,0).
  9. The 8 – Keyword 1 setting should already be blue as in VLIDE. If you want system constants such as T, nil and pi to also be that shade of blue then change 9 – Keyword 2 accordingly. Personally, I prefer a different shade so they stand out. Mid-dark cyan (0,128,192) works well.
  10. I like the pale grey background in BLADE that helps identify the current line. If you don’t, click next to 8 – Caret colour and turn off the Background color toggle.
  11. Switch to the Editor Colors sub-tab, click next to 5 – Selection colour and change the Back Color to a custom mid-blue (0,120,215).
  12. While you’re in the Editor Colors sub-tab, there are a few other non-VLIDE things you can play with. 1 – Brace hilight and 2 – Brace mismatch are dynamically applied to matching and non-matching parentheses respectively. I like my Brace hilight setting to be plum and bold (turn on the Attributes toggle to enable this):

I like my non-matching setting to be white on red (the inverse of a normal parenthesis so it shows up):

Changing all that should give you something that looks like this. Familiar enough?
There are several things in the above image that might be unfamiliar but which I suggest you leave turned on because they’re useful. If you really insist, here are the locations for these settings in the Preferences & Settings dialog:
  1. Line numbers  – View > Margins, Show line number margin
  2. Marker margin – View > Margins, Show marker margin. If this is turned off, bookmarks show up using the settings under Styles > Editor Colors > 13 – Bookmark marker.
  3. Edge marker (that vertical line on the right indicating 80 character width) – View > Edge marker > Type, No background.
  4. Indentation guides (those vertical lines that show you what your code is lining up with) – Tabs and EOL > Indentation, Show indentation guides.
  5. Code folding margin (the margin on the left that allows you to collapse functions, etc. – Folding and Wrapping > Show code folding margin.

Unlike VLIDE, the default in BLADE is to use spaces for indentation, not tabs. As I don’t know of any LISP developer who uses tabs except by accident, this is a much more sensible default. But if you really want to use tabs, turn it on using Preferences > Use tabs and set the width to the VLIDE default of 8 in Preferences > Set tab width.

If you’ve left opening parentheses on previous lines and have indented the following code as usual, then as you go on to finish off the code with closing parentheses, in BLADE a single backspace will take you back your indent width (2 spaces by default) rather than a single space as in VLIDE. If your coding finger can’t get used to this keystroke-saving feature, you can turn this off with Preferences > Backspace unindents.

Having done all that, and having arranged the rest of the interface to your needs (overall window size, pane and field widths, etc.), make sure you save it! It’s as simple as Preferences > Save preferences, but it’s not done automatically. If you want to keep a safe copy of your settings, you can do so with Preferences > Save preferences to file. This simply exports the relevant part of the registry to a .reg file of your choice. This is a text file you can hack about with at your leisure (using BLADE if you like!), and you can even make files that represent subsets of your preferences.

For example, I’ve removed all but the style settings from a .reg file I exported. I’ve uploaded it renamed as a .txt file because .reg files are considered dangerous by browsers, etc.

If you want to use this to give BLADE that old familiar VLIDE look, here are the steps.

  1. Download SteveVLIDE-likeBLADEStyleSettings.reg.txt.
  2. Rename the file to remove the .txt extension so it becomes SteveVLIDE-likeBLADEStyleSettings.reg.
  3. In BLADE, use Preferences > Load Config from File
  4. Close BLADE and BricsCAD.
  5. Restart BricsCAD and BLADE.

That should do it. Happy BLADEwork!

Interviewing the creator of BLADE – CAD’s best LISP IDE – part 2

This post continues my interview with Torsten Moses about BLADE, the new LISP IDE that arrived with BricsCAD V18.2. See here for post 1.

Steve: I’ve noted before that BricsCAD execution of AutoLISP and Visual LISP is several times faster than AutoCAD’s. How does the new technology affect that performance?

Torsten: All the new BLADE-related stuff doesn’t really affect normal LISP execution outside the IDE and debugger. The connection is made by a few callbacks, which take zero time in normal processing. Therefore there is also no chance of breaking things. The BLADE implementation is very safe, and performance remains high for normal usage. For the debugger and the synchronization, it is all home-brewed stuff, optimized for best performance even when debugging, and minimum system and LISP memory usage.

In the course of implementing the debugger and internal versus external synchronization, I also removed most emulations and implemented that as core OpenLisp functionality. That has the side-effect that the (repeat), (foreach) and (vlax-for) functions now run about five times faster at the loop construction. So rather than slowing things down, creating BLADE has actually speeded things up!

Steve: Will the Mac and Linux versions also get this feature?

Torsten: Yes, it is fully compatible. This is due to the implementations of WxWidgets and my own stuff. I have already verified BLADE running under Linux. There are no differences; even the implementation code has no Windows-specific stuff.

Steve: Can you give a simple example of the workflow of a debugging session?

Torsten: First, don’t pre-load any LISP file into BricsCAD. Such code loaded outside the debugger is fully functional, but it can’t be used for debugging. The special connection between internal and external representation is only established when loading the LISP code under a debug state.

Next, in BLADE open an existing FAS or VLX project, and/or a “Named Session”, or simply any LISP file you want to start debugging with.

Now you can select Start Debugging from menu or toolbar, or hit the F8 hotkey. The special Debug Toolbar will appear. You can either activate AutoBreak, which stops at first executable code, or activate the LISP source where you want to start debugging and place some breakpoints.

Then load the dedicated LISP file, either by the normal Load into BricsCAD function, or from the Load button in the Debug Toolbar. Now that loaded code is debug-enabled and you will see the file and debug-enabled functions in the two right tabs.

When the debugger halts at the first breakpoint, all debug-step modes are enabled in the toolbar, and you have all the usual debug step modes. More than in AutoCAD’s VLIDE, actually. You can set the watches (observed and tracked variables) as “Data Break Point” by activating the checkbox. Then, whenever that value changes, the debugger also stops automatically at the related LISP statement.

Steve: What if your code calls code in other files you haven’t loaded?

Torsten: Don’t worry about that. The debugger recognizes this and will ask to load the related LISP file on-demand. In normal LISP, you would get an unknown function error but the debugger catches this upfront. In fact, this is one of the high-end features – only load the primary LISP file, any further debugging into other files resolves by loading during the debugging session. This is very handy for dealing with complex apps – there’s no need to preload any other LISP source. I’m sure you’ve experienced Murphy’s Law, where the particular function you need is the one that’s not loaded. You won’t have that problem in BLADE.

Steve: Where to from here? Is this job done or is there still room for improvement?

Torsten: As BLADE is still a very young product, there is definitely a lot more to come. So far, the main target was to provide good debugging features, and a somewhat reasonable handling of projects, but not so much focusing on plain editor capabilities.

My to-do list still has a number of major key features to be implemented. We want to add a hotkey editor, because every developer loves his own keystrokes and learning others is a nightmare! We also want cross-reference checking on a per-file and per-session basis, mainly for bigger LISP applications.

Then, over time, the editor capabilities will be extended and improved, providing more features. One example is to provide an editor tooltip that shows a function signature and short help when hovering over a LISP function name.

And of course, I’m aware that when people start using this in production, a lot of feedback will arrive from developers in the form of wishes, hints for improvements and bug reports. It’s very likely there will be many wishes to implement several details to make BLADE resemble AutoCAD’s VLIDE more closely. This could be a bit difficult sometimes, and is also not the main target. I hope that developers will be open to a slightly different workflow, given the big advantages they get in return.

In general we are very open to developer ideas, needs and requirements, as we are with BricsCAD itself. In the end, it’s the developer who needs to work with BLADE, as easily and productively as possible. Even the initial release of BLADE is based on important feedback from beta testers such as Martin Drese (CAD Wiesel).

Steve: I can certainly attest to how well you respond to feedback. I’ve seen bugs I’ve reported fixed in a very short timeframe.

Torsten, thank you for your time. This has been very illuminating.

This interview is also available in one post on the Bricsys blog.

Interviewing the creator of BLADE – CAD’s best LISP IDE – part 1

Easily the most impressive new feature of BricsCAD V18.2 is the new Visual LISP IDE, BLADE (BricsCAD LISP Advanced Development Environment). The lack of any LISP IDE has been a BricsCAD stumbling block for a while, dissuading CAD Managers from adopting BricsCAD to replace their stagnant and increasingly expensive AutoCADs.

As I will relate elsewhere, Bricsys has not just caught up with Autodesk here, but has shot so far ahead it’s unlikely to ever be caught. BricsCAD’s BLADE is so superior to AutoCAD’s VLIDE in so many ways there’s really no comparison.

Yet it remains highly compatible. I have personal experience in making large amounts of AutoCAD LISP code (literally hundreds of routines) work in BricsCAD. That experience tells me that the vast majority of code will work just fine (and much faster) in BricsCAD. A tiny proportion of LISP or DCL code may need adjustment before it will work perfectly on both platforms, and that’s one reason an IDE that works within BricsCAD was an important step that Bricsys needed to take.

I had the chance to see this IDE privately in then-unnamed pre-release form when I attended the Bricsys Conference 2017 in Paris. I was surprised and delighted at the functionality demonstrated by its creator, Torsten Moses. I recently had the chance to interview Torsten about his creation.

Steve: I understand it was difficult to create a LISP IDE for BricsCAD because of the way BricsCAD’s LISP works. Can you explain that?

Torsten: BricsCAD LISP uses the OpenLisp core system, from French developer Christian Jullien. This is the only LISP engine still under development; the others I found stopped development in the mid-90s.

OpenLisp is a very modern implementation, not comparable to the old XLisp dialect used by AutoLISP. Even object-oriented features are supported. Therefore the internal representation of LISP expressions is different from the textual representation as seen in a LISP file.

Steve: So the AutoLISP code I write isn’t the code that BricsCAD executes?

Torsten: That’s right. A number of typical AutoLISP constructions were implemented by a kind of emulation, which drives the internal versus textual representation differences even further. That makes it a major challenge to synchronize the internal OpenLisp expression execution with the related textual representation in order to provide any debugging functionality.

Besides the plain technical details, which seemed to be virtually unresolvable, there was the expected heavy effort to implement a full-blown GUI. This was not just a plain editor, but the entire IDE GUI. It would have been a disaster, a major disgrace, if we had provided a VLIDE that was just up to AutoCAD standards. That was great in its time, but it’s 20 years later now. The idea of creating a LISP IDE for BricsCAD seemed so filled with difficulties that we put it off for a long time.

Steve: How did you finally manage to overcome these difficulties?

Torsten: First, it was a pure coincidence. [laughs] By luck, I discovered a hidden detail in OpenLisp – any LISP symbol (and expressions are a kind of anonymous symbols) can hold unlimited, attached custom data, very similar to XData in DWG database objects. I even knew about that for many years, but never worked out the shortcut to ‘misuse’ this for the LISP expression execution to editor and debugger bidirectional connection. Some initial quick tests showed that this approach was very suitable.

By another coincidence, I discovered that WxWidgets (our cross-platform system, not only for GUI) already includes support for the famous Scintilla editor, an OpenSource editor engine, widely used by many editors. WxWidgets even provides two levels of wrappers – a plain, core wrapper, and a high-level wrapper class system. This fits perfectly into the WxWidgets logic.

But still, that is only plain editor support – not a GUI. Then I found a very suitable, extensible editor and GUI implementation, based on that WxWidgets Scintilla system – as Open Source under the WxWidgets license. Hence, we are allowed to use that source code in a commercial application. That editor is called wxStEdit.

I verified that this source was suitable for our LISP IDE, and put in a lot of extra work to extend it. wxStEdit development finished in around 2008, and it still was compiling and working mostly fine. Nevertheless, in the course of extending that GUI, I found and fixed a lot of defects at all related levels (Scintilla, WxWidgets Scintilla wrapper and wxStEdit).

So it was this set of coincidences that suddenly opened both wings of a big gate!

See here for part 2 of this interview.

This interview is also available in one post on the Bricsys blog.

That awkward moment when I just failed to create BIM

I recently updated my resume, and I thought it might be relevant to include an episode from my early career. This post is an expansion on what I had to say about that episode.

I was managing a tiny CAD training and development company, Educad. Much of my time there was spent developing software called NIDIS (originally called NEEDS), a project that was started in 1987 or 1988 with Nixdorf Computer as the client. It was intended to take over the market among first the home building companies of Western Australia, then Australia, then the World!

What’s special about NIDIS is that it was a precursor to BIM. Using a 3D-adapted version of the 2D Educad architectural software within AutoCAD, designs of domestic homes could be efficiently created and infused with a degree of intelligence. This was then linked to the Nixdorf minicomputer-based software that contained pricing and other information about the various building components. This combined system enabled accurate quantity take-offs to be performed.

This was supposed to be a short project, but due to a massive amount of “scope creep” it took two years. I was really pushing the limits of what AutoCAD could be persuaded to do at that time and had to break new ground in several areas. Some of it was a kludge, but I made it work. Finally, the software was essentially completed, with a custom tablet menu (remember those?), full documentation and everything. Nixdorf CAD-spec PCs with big screens, tablets, AutoCAD and NIDIS were installed in the drawing office. It was successfully tested in Beta. The take-offs were very accurate. Everything looked good to go.

Then, two weeks before it was due to go into production, this project died. The building company that was sponsoring it, Mansard Homes, went into liquidation as it struggled unsuccessfully with the combined effects of very high interest rates and bad publicity about poor building quality and cost overruns. Nixdorf dropped the whole project like a hot potato and the product was never sold. I didn’t have any rights to the software and couldn’t do anything with it.

But it was software that was based around a 3D model of a building that contained some intelligent information, albeit extremely crude by today’s standards. I wrote, quite literally, Building Information Modeling software. It was completed in 1989, before the name BIM had even been used. The idea had existed since the mid 70s, but I didn’t know that at the time so I made it up as I went along.

I didn’t actually invent BIM, but I made something that resembled BIM that actually worked. And then it didn’t.

This is easily the most spectacular failure of my career. Still, I’m kind of proud of it.

Edit: for historical context, this video shows an unrelated system that was developed at about the same time as NIDIS.

How to sign your LISP files

This post follows on from Why digitally sign your LISP files? and How to obtain a digital signature to sign your LISP files.

In the first post, I explained why you might want to digitally sign your LISP files. In the second, I explained how to obtain and install a digital signature. This third and final post in the series assumes you have done all that and now want to sign your files. There are two methods available to you, using a dialog box or command-line interface.

Signing LISP using the AcSignApply.exe dialog box

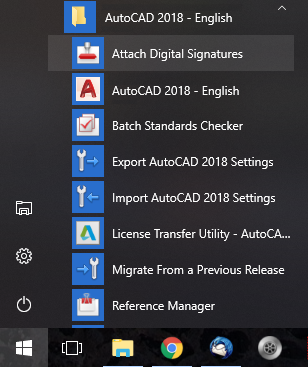
Autodesk has provided a utility called Attach Digital Signatures for years. This was provided to sign drawings, zip files, etc., but the ability to sign LISP files was added in AutoCAD 2016. Don’t go using the 2015 version or you’ll have a very frustrating time! You can invoke this utility using the Windows Start Menu:

You can also make your own desktop shortcut if you like. The executable is stored at (XXXX is your AutoCAD release number):

C:\Program Files\Autodesk\AutoCAD XXXX\AcSignApply.exe

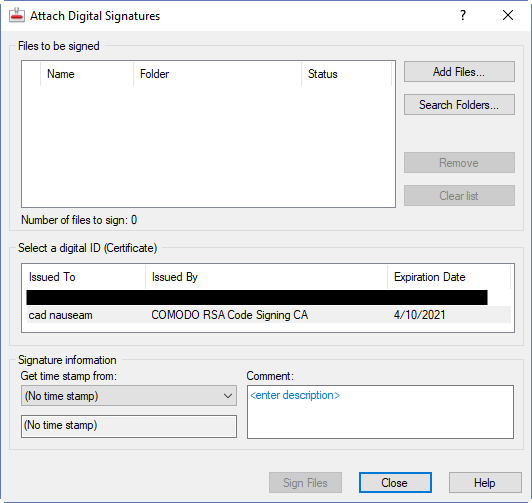
AutoCAD doesn’t need to be running when you start the application. Here’s the interface:

Half way down, there is a list of code signing certificates that you can use. You should see the one you obtained and installed earlier in this list. If you don’t see it listed it may not have been installed correctly. It’s possible to install a public key version of a certificate and see it listed in the Windows Certificate Manager, but that won’t help you sign code. You need to install the private key version in order to be able to sign things. If you do the wrong kind of export from your browser, or if you use the wrong browser to obtain and export the certificate, you may have installed the public key version. In such a case, you will need to contact the certificate provider for help. I have found that the online chat help provided by Comodo is excellent in such cases. Yes, I know this because I got it wrong the first time!

Assuming your certificate is visible, click on that line to select it. You can add files to the pane at the top left using the buttons on the right side or by simply dragging and dropping files onto the pane from Explorer. But wait! Before you do that, make sure you have a safe unsigned copy of all your files. Applying the signatures is a modification process; you are left with only the signed version of the files.

LISP files with the LSP, MNL, FAS, or VLX file extensions can be selected and dragged into the pane. As mentioned in the first post, there’s a bug in the original iterations of AutoCAD 2016 and AutoCAD 2018 that prevents signed VLX files from working, so I would advise against creating them. If you need to distribute signed DCL-based code and don’t want the LISP source visible, you will need to provide a signed FAS instead, along with a DCL file that’s either provided alongside the FAS or created on the fly by your code. Yes, this is a pain.

Note that at the time of writing, you can’t sign CUI, CUIx, DVB, JS, PGP and SCR files.

Once you have selected the certificate to use and the files to sign, select a source for the time stamp and enter a description in the Comment box (optional). Pick the Sign Files button and you’re done.

Signing LISP using the AcSignTool.exe command-line utility

This utility isn’t provided with AutoCAD, but you can download it here. It doesn’t require AutoCAD, which means you can sign LISP files even if you don’t have a copy of AutoCAD 2016 or later.

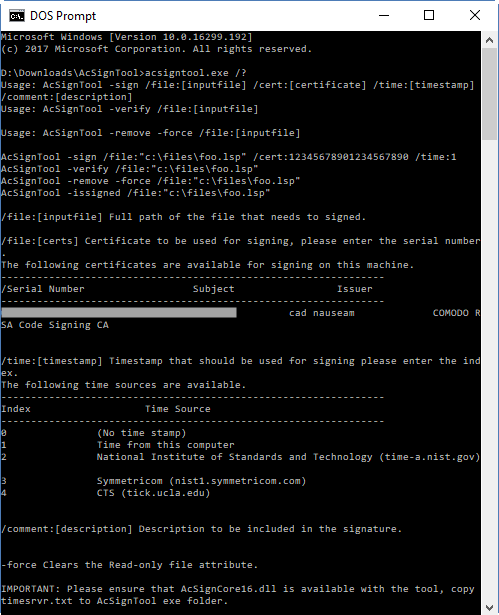
Once you have downloaded and unzipped the file, place the files somewhere handy. If you make a shortcut to cmd.exe that starts in that location, you can run this command to see all the options:

acsigntool.exe /?

Usage is usually as follows:

AcSignTool -sign /file:[inputfile] /cert:[certificate] /time:[timestamp] /comment:[description]

Here’s an example:

AcSignTool -sign /file:"X:\ToSign\MyCode.lsp" /cert:abcdef1234567890 /time:1 /comment:Hello

The resultant file should be the same as with the dialog box interface. If it’s a raw LISP file, a large comment like this will be placed at the bottom of the file:

;;;-----BEGIN-SIGNATURE-----
;;; /gcAADCCB/oGCSqGSIb3DQEHAqCCB+swggfnAgEBMQ8wDQYJKoZIhvcNAQELBQAw
;;; IE1hbmNoZXN0ZXIxEDAOBgNVBAcTB1NhbGZvcmQxGjAYBgNVBAoTEUNPTU9ETyBD
;;; CwYJKoZIhvcNAQcBoIIFQzCCBT8wggQnoAMCAQICEQCyNMZT2aa05avqeC3j+F3p
;;; YQBuAGQAYQByAGQAcwAgAGEAbgBkACAAVABlAGMAaABuAG8AbABvAGcAeQAgACgA
;;; MA0GCSqGSIb3DQEBCwUAMH0xCzAJBgNVBAYTAkdCMRswGQYDVQQIExJHcmVhdGVy
;;; QSBMaW1pdGVkMSMwIQYDVQQDExpDT01PRE8gUlNBIENvZGUgU2lnbmluZyBDQTAe
;;; bnB31gkc9o/M8YjPdGVjQG0VS96RVf/WtkmGugV2n1Fv4wWXBLA7n410yglqSZh9
;;; NOK2Ya1KFx4trccIHV1oAFN+BCKzSf6J/HdVkmCcy4TEPcrxSzZsi//slm2o9EHl
;;; mwdm6Quhw1wMT8+iRmJNO4ofwuKfBwyE28ZIK4q+zorJPNwiK2o43CmNJViU5SQD
;;; M9ImVtHTTtdAR1Iln+wEtg/4xgwj5KWuxoUJ22OJ/K0A8IcnxqGBujCBtwYDVR0O
;;; Fw0xNzEwMDQwMDAwMDBaFw0yMTEwMDQyMzU5NTlaMIGAMQswCQYDVQQGEwJBVTEN
;;; MAsGA1UEEQwENjE1NTELMAkGA1UECAwCV0ExEjAQBgNVBAcMCVdpbGxldHRvbjEV
;;; A1UdHwQ8MDowOKA2oDSGMmh0dHA6Ly9jcmwuY29tb2RvY2EuY29tL0NPTU9ET1JT
;;; QUNvZGVTaWduaW5nQ0EuY3JsMHQGCCsGAQUFBwEBBGgwZjA+BggrBgEFBQcwAoYy
;;; aHR0cDovL2NydC5jb21vZG9jYS5jb20vQ09NT0RPUlNBQ29kZVNpZ25pbmdDQS5j
;;; MYGvBIGsOAAyADsAMgAvADEAMAAvADIAMAAxADgALwA4AC8AMgA2AC8AMQA3AC8A
;;; TgBhAHQAaQBvAG4AYQBsACAASQBuAHMAdABpAHQAdQB0AGUAIABvAGYAIABTAHQA
;;; dABpAG0AZQAtAGEALgBuAGkAcwB0AC4AZwBvAHYAKQAAAA==
;;; -----END-SIGNATURE-----

Because it’s a comment, it will be ignored by AutoCAD releases prior to 2016, and by other AutoLISP-compatible CAD applications such as BricsCAD and ZWCAD.

References:
Signing your application modules for AutoCAD 2016 – Part 1 – Kean Walmsley
Signing your application modules for AutoCAD 2016 – Part 2 – including various other references
To Digitally Sign an AutoLISP File – Autodesk Knowledgebase article

How to obtain a digital signature to sign your LISP files

In an earlier post, I explained why you might want to digitally sign your LISP files. If you decide to go ahead with that, then this post explains how you can obtain and install the digital signature you will need to sign your files. This is the most difficult part of the process and it involves spending money.

Getting a digital signature

Although you can make your own digital signature (there’s an Autodesk Knowledgebase article describing the process), there’s little point in doing this. You can sign your files, sure, but that signature won’t be seen as trusted by software that checks for it. Anybody can create a signature like that, including one that impersonates you, and it doesn’t prove anything. The only purpose for such a home-made signature would be to test the methods you’ll be using to apply a proper trusted signature later.

Edit: if you do want to make your own signature, BlackBox informs me that the MakeCert tool in the Windows SDK mentioned in the Knowledgebase article is deprecated. He suggests using this PowerShell Cmdlet instead.

You’re going to need a signature that is trusted. That means you’re going to have to pay somebody trustworthy to trust you. There are a set of certifying authorities, trusted by Microsoft, Autodesk, etc. who can issue code signing certificates to companies and people. You need to prove who you are to one of those authorities and pay them to certify that you are who you say you are. So before you start, make sure you or your business are visible in terms of directory listings, publicly visible phone numbers, etc. If you are representing a company asking for a certificate, you can expect to be asked to produce evidence that you really represent that company. You can expect to confirm that your email and phone number are really under your control.

You only need to do this once a year, or even once every several years if you pay in advance. You might find that the evidence you need to provide changes at renewal time; for example a Yellow Pages listing that was OK in 2015 was no longer accepted when I renewed in 2017, so I had to register my business with another listing.

In my search for a certifying authority, I found that K Software, a reseller for Comodo, was the cheapest source for a code signing certificate, see here. An OV certificate will be fine for signing LISP.

K Software takes your money (USD $67 to $84 a year depending on the length of time you need), gets Comodo to provide the certificate, and provides a handy tool (KSign) that allows you to simply apply the certificate to various files without some of the messing about that’s otherwise required. It’s not useful for LISP files, though. Comodo also provides the support, and I’m happy to report that in my experience their customer service is excellent.

Note: it’s important that you pay close attention to the instructions when applying for your certificate. For example, the browser you use to apply for the certificate is vital. Choose one that’s suggested (e.g. Firefox) and which you expect to use later to obtain the certificate.

Installing a digital signature

Once your evidence is accepted and your payment has gone through, you will be sent an email with a special code, allowing you to obtain the certificate. It’s important that you’re using the same browser on the same computer that you used when applying for the certificate.

Once you click the link and obtain the certificate, you’ll want to export it. In Firefox 58.0, use Options > Privacy & Security and scroll to the bottom to see View Certificates. Select the certificate and pick Export. This will create a .P12 file that you can back up and install on this or another computer. To install the certificate, double-click the .P12 file and follow the prompts to assign it to the current user in the default location (Personal).

That’s it. You should now have a certificate installed that you will be able to use to sign LISP and other files. To check this, start the Windows Certificate Manager (C:\Windows\System32\certmgr.msc). Have a look in Current User > Personal > Certificates and you should find your newly installed certificate.

The next post in this series will explain how to apply this digital signature to your LISP files. That’s the easy bit.

Why digitally sign your LISP files?

After I mentioned in an earlier post that I had digitally signed the sample LISP file I had provided, this generated some interest. In this post, I’ll explain why you might want to sign your LISP files. In a later post, I’ll explain how to do it.

These days it is standard practice for developers to digitally sign their code. Operating systems and applications are displaying increasingly scary warnings when coming across unsigned code. Here is an example of the sort of message you get when you load an unsigned LISP file into AutoCAD from a location that has not been explicitly configured as a trusted location:

If you’re a CAD Manager dealing with your own internal code, it’s not too onerous to configure AutoCAD in Options > Files such that a folder is trusted by AutoCAD and place your code in there. The folder should be read-only; if it isn’t, AutoCAD warns you when you try to configure it. If you do this, the scary warnings don’t appear to bother and confuse your users, even if your code is unsigned.

Another way a CAD Manager can avoid the warnings is to set the SECURELOAD system variable to 0. That’s generally not recommended because it turns off AutoCAD’s security features. While you’ll probably get away with this, there’s always a chance that a user will load some malware and then you’ll have to explain yourself to management.

If you’re not just using your code internally and it’s going to be used by other parties, then you’re not going to have that level of control over the user environment. In recent AutoCADs it’s possible to set up the installation deployment such that users can’t turn off the security settings. If the CAD Manager at the location using your code has done this, your potential users are going to be presented with unprofessional-looking scary warnings.

If you sign your code, users might still get a warning, but it’s less scary. It identifies you as the verified source of the code so they will have more confidence in picking the Always Load button. Once they’ve done this, other signed code of yours will be automatically trusted.

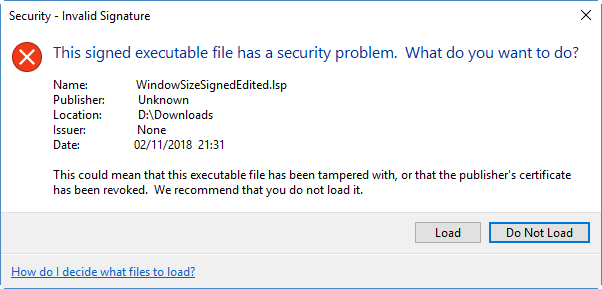
There’s another important reason you might want to sign your code, and that’s protection against other people’s modification of your code. If somebody edits your LSP file and then gives it to someone who tries to load it, the user is presented with an even scarier warning:

Note that this warning no longer has your name on it. This means it’s possible to protect yourself from people (internal or external) who well-meaningly hack about with your code and then try to blame you when it goes wrong. It also gives a level of protection against your code being infected by malware.

Note that all of the above only applies to AutoCAD 2016 and later. AutoCAD 2014 introduced some LISP loading security measures, but the signature stuff came a couple of releases later. Earlier AutoCAD releases, along with compatibles such as BricsCAD and ZWCAD, will just ignore the digital signature. It’s just a comment in the code as far as they’re concerned.

LISP files with the LSP, MNL, FAS, or VLX file extensions can be digitally signed. There’s a bug in the original iterations of AutoCAD 2016 and AutoCAD 2018 that prevents signed VLX files from working. This was patched later in both releases (2016 SP1 and 2018.0.2), but if you’re distributing your code externally there’s always a chance that your VLX might end up in the hands of somebody using a broken release. Also, VLX files that are digitally signed cannot be loaded into AutoCAD 2015 and earlier, broken or not. You should bear that in mind before distributing signed VLX files. I don’t do it and would advise against it. Thanks, Autodesk.

Given this information, if you decide that signing your LISP is a good idea, watch this space for information on how to do it.

All major Autodesk products on the Cloud by 2014?

As reported by multiple on-line news outlets, Autodesk just announced that it is increasing its research and development budget (having slashed it last year), and increasing the percentage of that budget on the Cloud. Carl Bass:

When there are technology transitions in place, you better be more mindful of that, or you become roadkill.

That’s fair enough. Autodesk would be stupid to ignore the Cloud, and needs to bet at least some of its cash on anything that stands a significant chance of being important. This quote from Autodesk spokesman Paul Sullivan gets more specific:

We are devoting a larger percentage of our R&D budget to cloud computing, with a significant portion of our new product investments going toward products that are cloud-enabled. We expect that all of our major products will be available in the cloud within the next three years.

Now “available” can mean various things. The restricted trial of Cloud-based AutoCAD, Inventor and other products is already year-old news, but that fits the “available” bill. So does a situation where the product is exclusively available on the Cloud and you can no longer buy standalone software. Between those two extremes, there are a variety of possible definitions of “available”. So we’re not that much wiser as a result of that statement.

However, one thing is clear. Autodesk is spending up big on making this Cloud thing happen, so traditional software is going to suffer from a comparitive lack of investment. Autodesk customers, you’re the source of all that cash. How do you feel about subsidising the move of your software tools to the Cloud?

Do you do any AutoCAD development?

Yes, that includes hacking about (or producing beautifully elegant code) in LISP. If so, you may wish to go here and fill in the appropriate API survey, which is probably the AutoCAD one.

This year, Autodesk is opening up this survey, which used to be confined to Autodesk Developer Network members. I approve. ADN represents a tiny (but important) minority of fee-paying developers approved by Autodesk. I expect the results will be rather different if a significant number of “normal” AutoCAD developers notice this survey and fill it in.

If you are, say, a LISP or VBA user and are feeling neglected, please go and have your say while you have the chance. The survey closes on 1 May.