Tag Archives: CUI

A & B Tip 5 – polyline areas

In this series of posts, I’ll be providing tips that show how to do something in both AutoCAD and BricsCAD, hence A & B.

The Series

The idea behind this series is to provide useful information for several sorts of reader:

  1. AutoCAD users.
  2. BricsCAD users.
  3. People in the process of transitioning from AutoCAD to BricsCAD and who need to know what to do differently (if anything).
  4. People considering transitioning from AutoCAD to BricsCAD and who want to know about the differences and similarities.

What area is that polyline?

There are several ways of determining the area enclosed by a polyline. This post goes through the various methods. You will also notice that in each of the methods, you get the length (perimeter) as a bonus.

Spoiler alert: the most efficient methods are at the bottom. There’s a one-click method in AutoCAD (it needs a little setting up first) and a zero-click method in BricsCAD.

LIST command in AutoCAD

The oldest method is the good old LIST command. Although this has been around for ever, here’s how it works in recent AutoCAD releases. Issue the LIST command, select the polyline, press Enter to finish the selection, and above your floating command line AutoCAD will show something like this:

If this display goes away and you want to see it again, hit F2 and it will return. If you have a docked command line, AutoCAD will display the information on the text screen, which it will then display:

If you have a floating command line but want to see the text screen rather than the over-the-command-line popup, you can switch to it using Ctrl+F2.

LIST command in BricsCAD

The command works in just the same way in BricsCAD as it does in AutoCAD with the docked command line.. The main differences are that the BricsCAD default interface has a docked command line, and that the text screen (called Prompt History in BricsCAD) is displayed even when using a floating command line.

If the text screen goes away or is obscured, you can restore it using the familiar-to-AutoCAD-oldtimers keystroke of F2 (not Ctrl+F2, which toggles the ribbon in BricsCAD).

Unit precision in BricsCAD

Another difference you might notice is that the only whole units are displayed. This is because BricsCAD respects the setting of DIMZIN when displaying values in the AREA command and AutoCAD doesn’t. In this drawing, DIMZIN is set to 8, which suppresses trailing zeroes. Because the area is exactly 448.0, BricsCAD displays it as 448. If DIMZIN is not set to suppress trailing zeroes, this doesn’t happen. If DIMZIN is set to 0, BricsCAD displays the area using the setting for linear units precision, LUPREC. If this is 4, the LIST command will display the area as 448.0000, as it does in AutoCAD.

This respect for DIMZIN applies in other places in BricsCAD too. For the remainder of this post I’ll have DIMZIN set to 0.

AREA command in AutoCAD

Another good old method is the AREA command. Issue the command, use the Object option and pick your polyline. You will be shown the area in two places as shown here:

AREA command in BricsCAD

The AREA command works similarly in BricsCAD. Although the options displayed indicate that the subcommand is Entity rather than Object, you can in fact use either E or O to initiate selection of an object. Unlike AutoCAD, the area is displayed in one place only, the command prompt area:

Note that the AREA command in both applications gives you more options, including adding together several areas.

Properties palette in AutoCAD

If you have the Properties palette visible (Ctrl+1 will toggle it on), you can simply select the polyline and the area will be displayed in the palette, thus:

Note that unlike the AutoCAD AREA command, the Properties palette does respect the value of DIMZIN. To display the trailing zeroes, first set DIMZIN to 0.

Properties palette in BricsAD

Using the Properties palette in BricsCAD is identical to AutoCAD. Here’s the display:

Quick Properties in AutoCAD

Quick Properties is a cursor-based cut-down version of the Properties palette. It’s not what you get when hovering, which is this:

What you want is Quick Properties, which you only get when you select an object, for example:

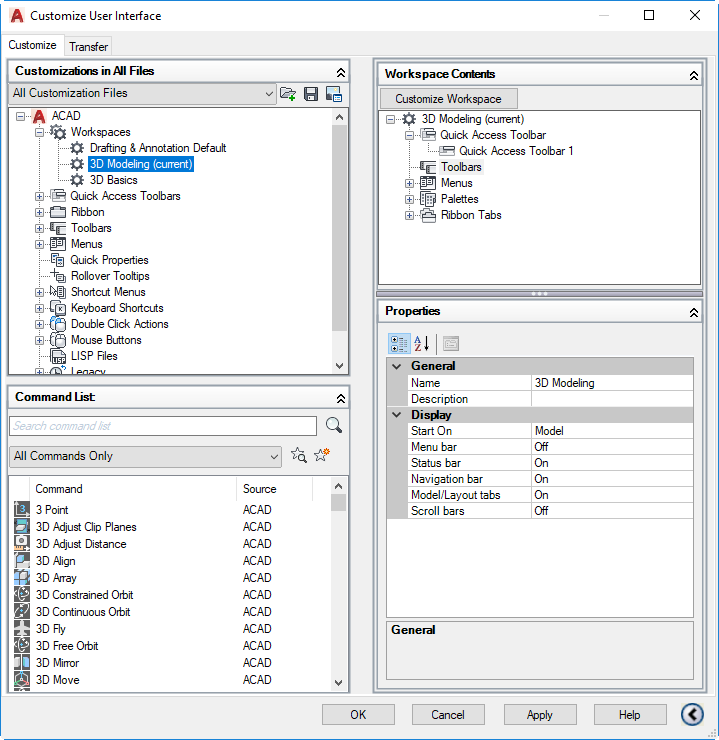
Unfortunately, Area is missing. It was there once upon a time, but there were performance problems so it was removed by default. However, you can add it back in. Invoke CUI and pick Quick Properties on the left. Scroll down on the right and pick Polyline.

Turn on Area (and Length if you want). Pick OK. Now see what happens when you select a polyline:

Note: in AutoCAD 2014 (and maybe others), the Area option was missing. There’s a workaround, but it’s a complex hack and well beyond the scope of this post.

Quad cursor in BricsCAD

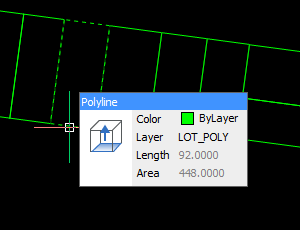
The easiest way to find a polyline area in BricsCAD is just to hover over it. The Quad cursor will appear, giving you the information you need:
Alternatives

If you’re doing this regularly, it makes sense to automate it as much as possible. Depending what you want, menu macros might help. There are also various free LISP routines around that do this sort of thing, for example these by Lee Mac. If you have more specific requirements (e.g. automatic area label, export to CSV), then that’s the sort of thing I do for a living so feel free to get in touch.

A & B Tip 4 – turning on toolbars

In this series of posts, I’ll be providing tips that show how to do something in both AutoCAD and BricsCAD, hence A & B.

The Series

The idea behind this series is to provide useful information for several sorts of reader:

  1. AutoCAD users.
  2. BricsCAD users.
  3. People in the process of transitioning from AutoCAD to BricsCAD and who need to know what to do differently (if anything).
  4. People considering transitioning from AutoCAD to BricsCAD and who want to know about the differences and similarities.

Your First Toolbar

If you are using a ribbon-based workspace, you may want to have some toolbars visible, too. There are several reasons you might want to do this. You might want some buttons to be consistently visible, no matter what the ribbon state. Although the QAT in AutoCAD provides some toolbar space, you might want more space than it offers. You might also want toolbar controls that are not available in the QAT; several of them only work in conventional toolbars. You might want the buttons in a different place, such as down one side or on a second screen.

If you have at least one toolbar visible already, things are easy. If you right-click on that toolbar, you will get a menu that allows you to turn on any other toolbar in the same customization group (CUI or CUIx file). Here it is in AutoCAD:

Here’s the equivalent in BricsCAD:

Note that in BricsCAD, the list of toolbars is one level down because the first-level right-click menu in BricsCAD gives you many more interface options.

What if the toolbar you want to turn on is in a different customization group? You can get at those easily enough by right-clicking on any blank (unused) area of a docked toolbar area. AutoCAD:

You can do the same in BricsCAD:

The difference with BricsCAD is that you don’t need to have a docked toolbar with spare space in it to access toolbars in different groups. They’re all available by right-clicking any toolbar button, docked or not.

That’s all easy enough, but what if you don’t have any toolbars visible? You’re stuck in a Catch-22 situation. You need a toolbar to click on to load a toolbar. How do you get that first toolbar loaded?

AutoCAD Interactive Method 1

The first trap to avoid in AutoCAD is using the TOOLBAR command. From Release 13 to AutoCAD 2005, that was useful. With the introduction of CUI files in 2006, the TOOLBAR command became a near-useless cut-down version of the CUI command.

Ignore that. If you’re going to use the CUI interface, use the whole thing. Enter the CUI command. In the top left pane, pick the workspace you want to change:

In the top right pane, pick Customize Workspace. In the left pane, expand the Toolbars part of the tree and turn on one of the toolbars:

Pick Done (top right) and OK (bottom). Your chosen toolbar will appear.

AutoCAD Interactive Method 2

If you have your pull-down menu bar turned on, you can get at the toolbars using the Tools menu as shown here:

You can turn on your pull-down menu bar by setting MENUBAR to 1.

Thanks to James Maeding for pointing that out.

BricsCAD Interactive Method

In BricsCAD, you can turn on toolbars interactively even if there are none visible, without having to deal with the CUI interface. Just right-click in any part of the ribbon, and you will see the same menu you get when right-clicking a toolbar area. That gives you access to all of the toolbars in all of the groups.

AutoCAD Command Line Method

If you want to use the command line to turn on a toolbar, you need to use the -TOOLBAR command (note the leading hyphen). You also need to know the name of the customization group and what the toolbar itself. One example is the Object_Snap toolbar within the ACAD group. The command line required is therefore:

-TOOLBAR ACAD.Object_Snap Show

To be sure this will work in all environments, I recommend you add the special characters _ and . thus:

_.-TOOLBAR ACAD.Object_Snap _Show

BricsCAD Command Line Method

In BricsCAD, you don’t need the leading hyphen in the TOOLBAR command (although you can use it if you like). The customization group and toolbar names will be different, but the syntax is the same. For example:

TOOLBAR BRICSCAD.TB_EntitySnaps Show

The recommended special characters also do the same job in BricsCAD:

_.-TOOLBAR BRICSCAD.TB_EntitySnaps _Show

Restoring the Classic workspace in AutoCAD 2015, 2016 and 2017, etc.

One of the more common queries on my putting things back to “normal” posts is how to restore the AutoCAD Classic workspace in those releases where it is absent. Since Autodesk removed that workspace it has been too involved a process to fully describe how to do it in the context of my post. In the 2017 version of that post I’ve added a useful link, but as that’s a massive post and the link is buried near the end of it, this may have escaped your attention.

Here’s the link to Brazilian AutoCAD expert Luciana Klein’s step-by-step guide. It’s for AutoCAD 2016, but the principles apply to other releases and variants. Thanks to Luciana for going to the effort of putting this together.

How to make Ctrl+C perform a Cancel

In a recent comment, I was asked how to make Ctrl+C perform a Cancel. Before I get onto that, here’s a bit of history.

Back in the Dark Ages of DOS, the way to cancel a command was by holding down Ctrl and pressing C. The last release to work like this by default was Release 13 for DOS, released in 1994. I remember the bother it caused my users who were faced with the Windows version in which Esc was used to cancel things and Ctrl+C copied objects to the clipboard. It took me at least a year before I had totally removed Ctrl+C = Cancel from my muscle memory.

Until AutoCAD 2005, Autodesk provided an easy option to keep things the way they were by turning off the toggle Options > User Preferences > Windows standard accelerator keys. In recent AutoCAD releases, you have still been able to do it, but it’s a little more involved and uses the CUI command. Here’s how:

  • Enter the CUI command.
  • In the top left pane, burrow down to Keyboard Shortcuts > Shortcut Keys.
  • In the bottom left pane, scroll down to find the Cancel item. Click and drag it onto Shortcut Keys in the top left pane. Because of a long-standing auto-scroll annoyance in the CUI interface, you will find this easier if you drag off to the right, then up, then left onto Shortcut Keys.

That adds Ctrl+C = Cancel to the set of shortcut keys AutoCAD understands, but it won’t work yet because it will clash with the Ctrl+C = CopyClip shortcut key that’s already in there. We need to get rid of that before we’re finished in CUI, or more usefully, assign it to a different key:

  • Find Copy Clip in the Shortcut Keys list in the top left pane and click on it.
  • In the bottom right pane, find Access > Key(s). Where it says CTRL+C, change that to something else of your liking (e.g. CTRL+ALT+C). If you pick the […] button, you will be able to record the keystroke sequence directly instead of typing it in and worrying about syntax.
  • Pick OK and you’re done.

This post may be directly useful to only a handful of people who are still holding out after all these years, but it also serves as an introduction to a more generally useful skill; setting up keyboard shortcuts in CUI.

Restoring Hatch double-click in AutoCAD 2011

In AutoCAD 2011, the default action when double-clicking on a hatch object is to invoke the Properties palette for that object. In previous releases, it would invoke the Hatch Edit dialog box. In my AutoCAD 2011 – Putting things back to “normal” post, I briefly described how to restore the old double-click action. I have since seen some incorrect advice being given out about how to do this, so this post describes the correct process in full detail.

What to do

  1. Invoke the CUI command.
  2. In the top left pane, find the [+] next to Double Click Actions and left-click on it.
    Double Click Actions
  3. Scroll down that top left pane a little until you can see Hatch.
    Hatch
  4. In the bottom left pane (Command list), click on any command and type H. This should take you down to the Hatch Edit command. If not, just scroll down a little more until you can see it.
    Hatch Edit
  5. Left-click on the Hatch Edit command in the bottom left pane, hold down the mouse button and drag the command up onto the top right pane until it hovers over the Hatch item you exposed in step 3. When the little blue triangle is pointing to Hatch, let go of the mouse button, thereby dropping the Hatch Edit command onto Hatch.
    Drag and Drop
    Hint: you may find that the top left pane scrolls crazily while you attempt this step. Unfortunately, this is a “feature” of the CUI interface. If this happens, keep your mouse button held down and move your cursor up and down in the left pane until the scrolling comes under control and you are hovering over the right spot. You can avoid this if instead of dragging the command directly upwards, you move in a curcuitous route to the left or right, moving on to the top left pane from the side rather than the bottom.
  6. Pick OK and that should be it. Double-click on a hatch object and see what happens.

What not to do

You may see some advice telling you to find the Hatch double-click action (step 3 above) and then edit the macro of the Properties command found therein from “^C^C_properties” to “^C^C_hatchedit”. Do not do this.

Why not to do it

If you edit the macro then try it out, it works fine. Why, then, does it matter which method you use? Because if you edit the macro, you are changing the action that occurs not just for the Hatch double-click, but for every place the Properties command is used. This means it will have undesirable side-effects in many places. For example, double-click on a circle after changing the macro and you will see something like this:
Command: _hatchedit
Selected object must be a hatch object or associative hatch block.
HATCHEDIT does not support old-format non-associative hatch blocks.
Select hatch object:

What to do if you’ve already done it

If you have already changed the Properties macro, go back into CUI and reverse the process, changing the macro back to “^C^C_properties” (without the quotes). When you are happy that you’ve fixed that up, use the click-and-drag method described above.

Screen captures created and modified using SnagIt 8 by TechSmith. Disclosure: Shaan Hurley gave me a free copy of this software (and Camtasia Studio 4, and a long-sleeved T-shirt which I promptly ruined by spilling red wine on it) at Autodesk University 2006.

AutoCAD 2010 – Will you miss the Menu Browser?

I’ve closed the poll that asked AutoCAD 2009 users about their MENUBAR setting. It’s very clear that pull-down menus are still very much in use in the Ribboned world of post-2008 AutoCAD. In AutoCAD 2009, an attempt was made to provide access to pull-down menus without sacrificing that strip of screen real estate. That attempt was called the Menu Browser, it was one of the thing you could find under the Big Red A, and it really didn’t work very well. In AutoCAD 2010, the Menu Browser has gone away. The A hasn’t gone away, just the ability to access pull-down menus through it.

There are some who have expressed a deep dislike of the Big Red A, although it never offended me greatly. I just wished the features hidden under it worked better than they did in 2009. Personally, I generally prefer what’s under the A in 2010 than what’s there in 2009, but you may not. I know that when the 2009 user interface was being attacked, its most prominent defenders were those keyboard-heavy users who turned both the Ribbon and the menu bar off, giving themselves more screen space. On the infrequent occasions when a pull-down menu was required, those people were content to provide an extra click.

When I found out about the Menu Browser’s death a few months ago, I expected there would be a severe adverse reaction from such people. Maybe there will be one when people hold get the shipping product and notice it’s gone. But after my poll showed only 7% of respondents used it instead of the menu bar, I’m now expecting that adverse reaction to be smaller than I originally thought.

If you want to use AutoCAD 2010, want to work without a menu bar but still have access to menu items occasionally, what can you do? You can add a button to the Quick Access Toolbar (QAT), or any other toolbar, that toggles the menu bar on and off. Use the CUI command to add such a button.* The following macro will do the job:

'menubar $M=$(-,1,$(getvar,menubar))

There are a couple of downsides to this method. First, although this macro has been written in such a way that it should be transparent, it doesn’t currently work that way. When you push the button, AutoCAD will still cancel any command you’re in. Second, the screen resize forces a redraw, which could slow you down in very complex drawings. However, under most circumstances that redraw will still be quicker than waiting for a reaction from AutoCAD the first time you pick the Big Red A. By the way, that reaction time is better in 2010 than the very tardy 2009. As a result, even AutoCAD 2009 users might prefer to use the QAT-button method and forget the Menu Browser ever existed.

* If there is enough interest, I will do a video tutorial explaining how to add such a button to the QAT.

What is loaded at AutoCAD startup, and when?

Warning, CAD nerd stuff ahead. This is a long and technical post and if you’re using AutoCAD in a largely out-of-the-box state you probably won’t care about any of it.

If your modification of AutoCAD extends beyond the trivial, you may find it useful to know what AutoCAD loads, and in what order things are loaded. It is possible for LISP files in particular to tread on each other’s toes, so knowing what gets loaded when can be useful information for diagnosing such clashes. This post aims to provide that information. It uses AutoCAD 2009 as an example, but the same principles apply to all releases from AutoCAD 2006 onwards.

On startup, the first things AutoCAD loads are its CUI files. It first loads the Enterprise CUI file, then the Main CUI file, then any partial CUI files attached to the Main, then any partial CUI files attached to the Enterprise. I have no idea of the reasoning behind this slightly strange order, but there it is. The order of the partial CUIs loaded in each case is determined by the order in which they appear in the parent CUI files, which is determined by the order in which you attached them. If you don’t like this order, you can attach and reattach them in the CUI interface, or you can do the same thing much quicker with a text editor if you feel confident enough. If there are LISP files associated with these CUI files, they are not loaded yet. You’ll need to wait a few paragraphs for that.

Next, if you have created a file called acad.rx in AutoCAD’s search path, any ARX files listed in that file will be loaded. There are other ways in which developers can load their ARX files at startup, but I won’t go into that here.

Following that, the acad*.lsp files are loaded. First, Autodesk’s acad2009.lsp file is loaded. Next, if you have created a file called acad.lsp, that is loaded. These two files are only loaded at first startup, unless the ACADLSPASDOC system variable is set to 1, in which case the acad.lsp file is reloaded with each new drawing. Next comes Autodesk’s acad2009doc.lsp and any acaddoc.lsp file you may have created, in that order. These two files are loaded at startup and with every new drawing session.

It’s worth pointing out here that the acad200x.lsp and acaddoc200x.lsp files are Autodesk’s and are not intended to be modified by users. You can modify them, and adding things in there works fine, but updates and hotfixes can overwrite these files, leaving you to patch things up again afterwards. The acad.lsp and acaddoc.lsp files are yours, and that is where you are best advised to put your additions.

I hesitate to mention VBA because I have long avoided that development environment and my knowledge in that area is very limited, but if you’re a VBA developer and have created an acad.dvb file in AutoCAD’s search path, it gets loaded at this point.

Once the acad*.* files are loaded, then come any LISP files associated with the CUI files that were loaded at the beginning. For each CUI file, if there is a *.mnl file of the same name, that will be loaded first (*.mnl files are just *.lsp files renamed). After that, any LISP files that are specified in the CUI file will be loaded, in the order in which they appear in the CUI file itself. This order can be modified in the same ways that the partial CUI loading sequence can be modified; “delete” and “load” (detach and attach, really) the files within the CUI interface, or hack the CUI file with a text editor.

The CUI-associated LISP files are loaded as described in the above paragraph for each CUI file in turn, in the same order as the CUI files themselves: Enterprise, then Main, then partials to Main, then partials to Enterprise.

The Appload command provides a Startup Suite facility, where you can specify any number of files to load (*.arx, *.lsp, *.dvb, *.dbx, *.vlx or *.fas). If you have done so, those files are loaded at this point, in the order in which they appear in the Startup Suite list.

That’s all the actual loading done, but we’re not finished yet. At this point AutoCAD’s environment should be all ready to do pretty much anything, including things that modify the drawing database, including invoking commands. This was not true earlier on, so if you want to do things like change the drawing or run commands, this should be done using a startup routine rather than called directly at load time from any of the files loaded above.

If you’ve defined a VBA sub called AcadStartup(), it will be called now. If starting a new drawing, any sub called AcadDocument_Activate() will be called instead. The caveat about my VBA ignorance still applies here.

If a LISP function called (S::STARTUP) has been defined, it will be called next. Where could that be defined? Anywhere in any of the LISP files mentioned above, or in any LISP or other files that are loaded by any of those files, or by any files that are loaded by any of those files, and so on ad infinitum. It could even be defined in one of the ARX files loaded at any point. This would be unusual, but is quite possible.

If there are multiple (S::STARTUP) functions defined in various places, which one wins? Whichever one loaded last. That’s why the load order can be important, but it’s also why you should never have an unconditional (defun S::STARTUP …) definition in your LISP code. Instead, you should append your startup code to any existing (S::STARTUP) function. That way, your startup can cooperate with any others in your environment rather than walking all over it. If there is some interest in that subject, I can cover it in more detail in a future post.

In summary, here is the AutoCAD startup sequence:

A. CUI files loaded:
1. Enterprise
2. Main
3. Partials to Main
4. Partials to Enterprise

B. acad*.* files loaded:
1. Files listed in acad.rx
2. acad2009.lsp
3. acad.lsp
4. acad2009doc.lsp
5. acaddoc.lsp
6. acad.dvb

C. CUI-associated MNL and LSP files loaded:
1. Enterprise named MNL
2. Enterprise loaded LSP and MNL
3. Main named MNL
4. Main loaded LSP and MNL
5. Partials to Main named MNLs
6. Partials to Main loaded LSPs and MNLs
7. Partials to Enterprise named MNLs
8. Partials to Enterprise loaded LSPs and MNLs

D. Startup suite files loaded

E. Startup routines run:
1. AcadStartup() called (AutoCAD startup)
2. AcadDocument_Activate() called (Drawing startup)
3. (S::STARTUP) called

AutoCAD 2009 – Ribbon content for Express Tools

One of the many unfinished aspects of the AutoCAD 2009 Ribbon is the lack of Express Tools content. One enterprising user has put the effort into correcting this, and has posted an Express Tools CUI replacement in this Autodesk newsgroup thread. I have not tested this myself. As usual with CUI, be paranoid. Back up everything before you touch anything.

While I wouldn’t normally suggest you do any Ribbon custom work in 2009 in its current state, it shouldn’t hurt in this case as it should be easily redoable once Autodesk has fixed up the worst of the 2009 CUI problems. Anything else you do should be considered as disposable. The problems with 2009’s CUI are so fundamental that it is quite likely a restructure will be required to fix them, either in a service pack or in 2010. That means your 2009 CUI efforts may need to be redone, just like your AutoCAD 2008 Dashboard modifications.

Where have all the developers gone?

I noticed in Ralph Grabowski’s latest upFront.eZine that Autodesk has announced that 100 developers have 200 add-ons working with its 2009 series of software. I hope I’m not supposed to be impressed by those numbers. I remember when Autodesk boasted about having over 3500 third-party developers. What happened to the other 3400-odd? This is a serious question; if anybody knows where they all went, and why, I’d love to know.

Of those two hundred 2009-ready applications, how many of them take advantage of 2009’s Big New Feature, the Ribbon? My guess would be close to zero. Why? Because the AutoCAD 2009 CUI architecture is all wrong. Adding custom stuff to the Ribbon is simply a lot more trouble than it’s worth. Even Autodesk’s own vertical teams have shunned it.

AutoCAD 2009 – The Prequel Part 16 – Ribbon Performance 1

One of the things I like least about AutoCAD 2009 (at least in Release Candidate form) is that I find it very “sticky”. That is, I find myself having to wait for an instant here, then again there, yet again over there. Most of my testing has been on a middle-aged Pentium 4 (3.0 GHz dual core – not too ancient), and it is particularly noticeable there. On my newer Core2 machine, things are better.

When AutoCAD 2009 starts shipping, I suspect your perception of it will be strongly influenced by your hardware. Top gun users on slow machines are going to feel frustrated; slower users on fast machines will wonder what the problem is.

I made a video that shows Ribbon tab switching performance. This is an important aspect of the new interface. Because the Ribbon hides tools behind different tabs, quick access to those tools relies on near-instant tab switching. How well does AutoCAD 2009 do at that? Let’s have a look on a fairly quick PC (Core2Duo E6600 with 4 GB RAM, under Windows XP SP2 32 bit). I intend to do the same in Vista later.

Ribbon tab switching performance in XP

Measured on a faster machine and viewed objectively, it looks rather better than my perceptions from the slower machine had led me to believe. The real problem is the first exposure of each tab, because after that the tab contents can be retrieved from cached memory. The Tools tab is tardiest; 1.6 seconds here translates to 3 seconds or more on an older PC. For the most part, the tab switching speed is acceptable after the tab has been exposed for the first time. For most users, a delay of 0.3 seconds between input and response is quick enough to be considered instant, and most tabs switch in a time fairly close to that after the first exposure.

One way of avoiding or reducing tab switching frustration is to make your own custom Ribbon with a home tab full of the things you use most of the time. How easy is that? Unfortunately, it’s not. Using CUI to make Ribbon parts is not a pleasant experience. That interface makes the Ribbon look super-snappy in comparison. The Ribbon’s more complex internal structure combines with CUI’s snail-like performance, bugs, restrictions and design errors both old and new, to make custom Ribbon creation a loathsome task.

AutoCAD 2009 – The Prequel Part 10 – Dude, where’s my Dashboard?

Dude, Dashboard’s dead. Defunct. Done. AutoCAD 2009 replaced the Dashboard with the Ribbon. If you type in the DASHBOARD or DASHBOARDCLOSE commands, they are just converted to the RIBBON and RIBBONCLOSE commands, which turn the Ribbon on and off.

If you’re a fan of the Dashboard (and I never was), there is good and bad news. The good news is that you can right-click on various parts of the Ribbon, pick Undock and you get a Dashboard-like floating vertical Ribbon that can be resized and configured very easily in terms of turning panels on and off. You can’t do that with Microsoft’s Office 2007 Ribbon. Performance aside (more on that later), I generally prefer the way the vertical Ribbon works, compared with the Dashboard. But I’m still not a fan.

AutoCAD 2009's Vertical Ribbon

The bad news is that if you put a lot of effort into customising your Dashboard in 2008, your work is lost. There is currently no automated migration path from your Dashboard to the Ribbon, so it’s time to start again. This involves using CUI, and unfortunately the process is slow and immensely frustrating. This is due to a combination of the long-standing CUI shortcomings and a set of new ones introduced to go with the Ribbon. Buy yourself one of those squeezy stress-ball things, you’re going to need it.