This post follows on from Why digitally sign your LISP files? and How to obtain a digital signature to sign your LISP files.
In the first post, I explained why you might want to digitally sign your LISP files. In the second, I explained how to obtain and install a digital signature. This third and final post in the series assumes you have done all that and now want to sign your files. There are two methods available to you, using a dialog box or command-line interface.
Signing LISP using the AcSignApply.exe dialog box
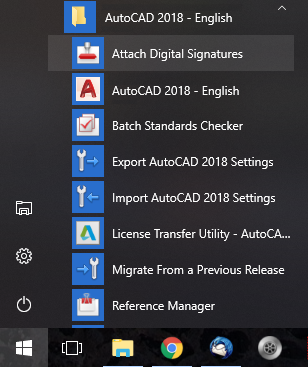
Autodesk has provided a utility called Attach Digital Signatures for years. This was provided to sign drawings, zip files, etc., but the ability to sign LISP files was added in AutoCAD 2016. Don’t go using the 2015 version or you’ll have a very frustrating time! You can invoke this utility using the Windows Start Menu:

You can also make your own desktop shortcut if you like. The executable is stored at (XXXX is your AutoCAD release number):
C:\Program Files\Autodesk\AutoCAD XXXX\AcSignApply.exe
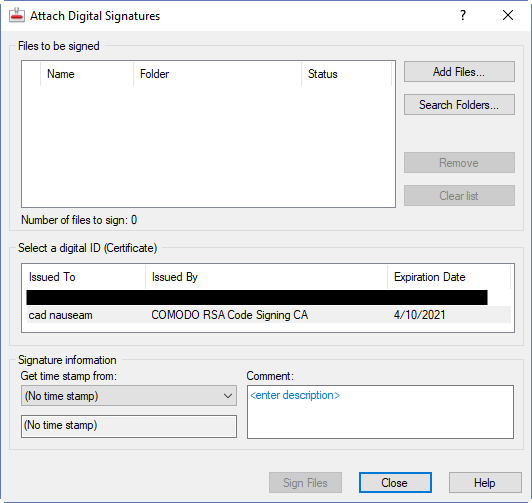
AutoCAD doesn’t need to be running when you start the application. Here’s the interface:

Half way down, there is a list of code signing certificates that you can use. You should see the one you obtained and installed earlier in this list. If you don’t see it listed it may not have been installed correctly. It’s possible to install a public key version of a certificate and see it listed in the Windows Certificate Manager, but that won’t help you sign code. You need to install the private key version in order to be able to sign things. If you do the wrong kind of export from your browser, or if you use the wrong browser to obtain and export the certificate, you may have installed the public key version. In such a case, you will need to contact the certificate provider for help. I have found that the online chat help provided by Comodo is excellent in such cases. Yes, I know this because I got it wrong the first time!
Assuming your certificate is visible, click on that line to select it. You can add files to the pane at the top left using the buttons on the right side or by simply dragging and dropping files onto the pane from Explorer. But wait! Before you do that, make sure you have a safe unsigned copy of all your files. Applying the signatures is a modification process; you are left with only the signed version of the files.
LISP files with the LSP, MNL, FAS, or VLX file extensions can be selected and dragged into the pane. As mentioned in the first post, there’s a bug in the original iterations of AutoCAD 2016 and AutoCAD 2018 that prevents signed VLX files from working, so I would advise against creating them. If you need to distribute signed DCL-based code and don’t want the LISP source visible, you will need to provide a signed FAS instead, along with a DCL file that’s either provided alongside the FAS or created on the fly by your code. Yes, this is a pain.
Note that at the time of writing, you can’t sign CUI, CUIx, DVB, JS, PGP and SCR files.
Once you have selected the certificate to use and the files to sign, select a source for the time stamp and enter a description in the Comment box (optional). Pick the Sign Files button and you’re done.
Signing LISP using the AcSignTool.exe command-line utility
This utility isn’t provided with AutoCAD, but you can download it here. It doesn’t require AutoCAD, which means you can sign LISP files even if you don’t have a copy of AutoCAD 2016 or later.
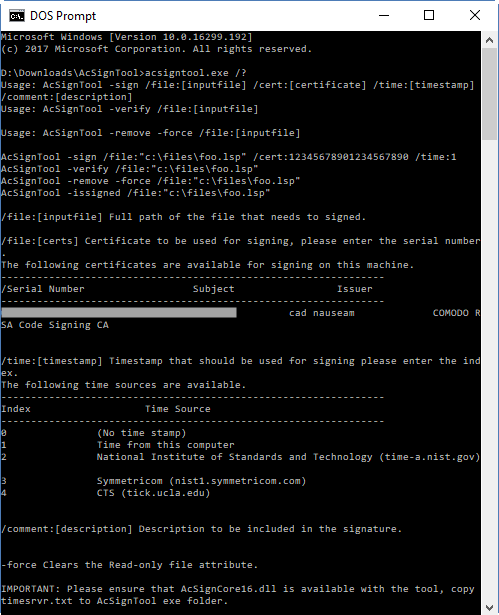
Once you have downloaded and unzipped the file, place the files somewhere handy. If you make a shortcut to cmd.exe that starts in that location, you can run this command to see all the options:
acsigntool.exe /?

Usage is usually as follows:
AcSignTool -sign /file:[inputfile] /cert:[certificate] /time:[timestamp] /comment:[description]
Here’s an example:
AcSignTool -sign /file:"X:\ToSign\MyCode.lsp" /cert:abcdef1234567890 /time:1 /comment:Hello
The resultant file should be the same as with the dialog box interface. If it’s a raw LISP file, a large comment like this will be placed at the bottom of the file:
;;;-----BEGIN-SIGNATURE-----

;;; /gcAADCCB/oGCSqGSIb3DQEHAqCCB+swggfnAgEBMQ8wDQYJKoZIhvcNAQELBQAw

;;; IE1hbmNoZXN0ZXIxEDAOBgNVBAcTB1NhbGZvcmQxGjAYBgNVBAoTEUNPTU9ETyBD

;;; CwYJKoZIhvcNAQcBoIIFQzCCBT8wggQnoAMCAQICEQCyNMZT2aa05avqeC3j+F3p

;;; YQBuAGQAYQByAGQAcwAgAGEAbgBkACAAVABlAGMAaABuAG8AbABvAGcAeQAgACgA

;;; MA0GCSqGSIb3DQEBCwUAMH0xCzAJBgNVBAYTAkdCMRswGQYDVQQIExJHcmVhdGVy

;;; QSBMaW1pdGVkMSMwIQYDVQQDExpDT01PRE8gUlNBIENvZGUgU2lnbmluZyBDQTAe

;;; bnB31gkc9o/M8YjPdGVjQG0VS96RVf/WtkmGugV2n1Fv4wWXBLA7n410yglqSZh9

;;; NOK2Ya1KFx4trccIHV1oAFN+BCKzSf6J/HdVkmCcy4TEPcrxSzZsi//slm2o9EHl

;;; mwdm6Quhw1wMT8+iRmJNO4ofwuKfBwyE28ZIK4q+zorJPNwiK2o43CmNJViU5SQD

;;; M9ImVtHTTtdAR1Iln+wEtg/4xgwj5KWuxoUJ22OJ/K0A8IcnxqGBujCBtwYDVR0O

;;; Fw0xNzEwMDQwMDAwMDBaFw0yMTEwMDQyMzU5NTlaMIGAMQswCQYDVQQGEwJBVTEN

;;; MAsGA1UEEQwENjE1NTELMAkGA1UECAwCV0ExEjAQBgNVBAcMCVdpbGxldHRvbjEV

;;; A1UdHwQ8MDowOKA2oDSGMmh0dHA6Ly9jcmwuY29tb2RvY2EuY29tL0NPTU9ET1JT

;;; QUNvZGVTaWduaW5nQ0EuY3JsMHQGCCsGAQUFBwEBBGgwZjA+BggrBgEFBQcwAoYy

;;; aHR0cDovL2NydC5jb21vZG9jYS5jb20vQ09NT0RPUlNBQ29kZVNpZ25pbmdDQS5j

;;; MYGvBIGsOAAyADsAMgAvADEAMAAvADIAMAAxADgALwA4AC8AMgA2AC8AMQA3AC8A

;;; TgBhAHQAaQBvAG4AYQBsACAASQBuAHMAdABpAHQAdQB0AGUAIABvAGYAIABTAHQA

;;; dABpAG0AZQAtAGEALgBuAGkAcwB0AC4AZwBvAHYAKQAAAA==

;;; -----END-SIGNATURE-----
Because it’s a comment, it will be ignored by AutoCAD releases prior to 2016, and by other AutoLISP-compatible CAD applications such as BricsCAD and ZWCAD.
References:
Signing your application modules for AutoCAD 2016 – Part 1 – Kean Walmsley
Signing your application modules for AutoCAD 2016 – Part 2 – including various other references
To Digitally Sign an AutoLISP File – Autodesk Knowledgebase article