Category Archives: Tip

How to get your Wacom Graphire 4 tablet working in Windows 10

I’ve been setting up a new PC at home and one of the things I struggled with was getting my Wacom Graphire 4 tablet working. This isn’t a CAD tablet (remember those?); instead, I use its pressure-sensitive stylus for image creation and editing. Press harder and you get more ink. Turn the pen over and you automatically erase instead of drawing. Press the eraser harder and you get more erasing.

I use PaintShop Pro for my image work, by the way, not Photoshop. You can still buy and optionally upgrade PaintShop Pro perpetual licenses, which is how it should be. You’re probably aware that I don’t rent stuff unless there’s no realistic alternative.

According to the Wacom FAQ, I was severely out of luck.

What is the latest driver for the Graphire 3 & 4 (CTE) tablets?
The Graphire 3 & 4 CTE tablets made from 2003-2007 are no longer supported by Wacom and will not work with a current tablet driver. Below are links to the latest drivers available for these tablets.

Windows 8, Windows 7, Vista & XP Download Here
Mac 10.8, 10.7 & 10.6 Download Here

Not one to give up so easily, I tried a variety of drivers for my tablet (model CTE-440). They were either blocked from installation by Windows 10×64, or in the best case scenario failed to provide any functionality other than acting as a basic mouse. The tablet failed to appear as a WinTab device, so I couldn’t configure PaintShop Pro to use its pressure-sensitivity, defeating the object of having the thing in the first place.

So I did what I thought was best and put the tablet out on the verge with the other junk awaiting council collection and investigated a replacement. Not from Wacom, obviously! I don’t want to reward a company for abandoning its products. I was checking out Huion tablets, which are so much cheaper than Wacom’s that it’s probably worth taking a punt and buying one anyway.

But then the stubborn streak in me (have you noticed?) kicked back in and I had one last go. A bit more in-depth Googling led me to this page. This is an old, non-maintained, leftover page from Wacom Europe. Let’s hope it stays there. On that page I found the driver I needed: DRIVER 5.30-3 RC FOR WINDOWS 8, WINDOWS 7, VISTA, AND XP. The direct link to the driver installation executable (cons530-3_int.exe) is:

http://downloadeu.wacom.com/pub/WINDOWS/cons530-3_int.exe

I retrieved my tablet from the junk pile, installed that driver, cleaned off my tablet while my system rebooted, plugged it in and away I went! In PaintShop Pro 2018, the setting is found at File > Preferences > General Program Preferences in the Miscellaneous section.

Wacom’s FAQ gave me a bum steer. Yes, the driver I used isn’t supported in Windows 10 and it isn’t current, but I don’t care. It works just fine and means my perfectly good as-new tablet isn’t landfill. Wacom needs to do better both in terms of supporting its hardware with current drivers and providing more useful information to its customers.

Video – 3Dconnexion fine tuning in BricsCAD and BricsCAD Shape

The second video in the cad nauseam YouTube channel is more typical than the first in that it’s a tips and tricks video. In this case it only applies to BricsCAD and Shape users, but future videos will provide information for AutoCAD and other DWG-based CAD applications.

CAD Panacea tip – startup files in BricsCAD

One of the things that might initially baffle a CAD Manager or power user when investigating switching from AutoCAD to BricsCAD is how to set up the startup routines. Head over to CAD Panacea for R.K. McSwain’s concise, handy description of how to do it.

Due to BricsCAD’s high level of compatibility, you can maintain a common folder or set of folders containing LISP and other custom files for both applications. That way, you don’t need to do double maintenance during the transition period. I’ve done this successfully in a highly complex custom environment. Some code and other adjustments were required in places, but all but a handful of my hundreds of AutoCAD LISP files worked as-is in BricsCAD with zero effort.

Having added your AutoCAD custom folder(s) to BricsCAD’s search path, I suggest you make a common startup LISP file (e.g. rename your old acaddoc.lsp to something like CADStartupDoc.lsp) and have tiny stub startup LISP files for each application (acaddoc.lsp and on_doc_load.lsp) that each loads the common startup file.

acaddoc.lsp contents:
(load "CADStartupDoc")

on_doc_load.lsp contents:
(load "CADStartupDoc")

You can add error checking and messaging if you like, but if you have control of your environment you probably won’t even need that. If you find you do need any application-specific code, you can just add it or load it from the acaddoc.lsp or on_doc_load.lsp stubs as appropriate.

BLADE – putting things back to “normal”

Disclaimer: I’m making money using BLADE. I’m using it on a paying project right now (well, not while I’m typing this, but you get the idea). I’m developing a routine to automate a massively repetitive task for one of my AutoCAD-using clients, and I’m developing it in BricsCAD and BLADE rather than AutoCAD and VLIDE.

I can simply develop faster in the more modern environment, and BricsCAD’s significantly quicker start-up time helps with that. So does the fact that the routine runs several times faster in BricsCAD, making testing the large data sets much more efficient. I’m getting paid on results and not by the hour, so using BLADE is putting cash straight into my pocket while giving me more time to walk my dog.

Using BLADE in production, I’m discovering a few bugs, quirks and things I don’t like. That’s totally understandable with a new feature of this level of complexity and functionality. Where I think it makes sense, I’m submitting problem reports or feature requests to Bricsys. I’m sure Bricsys already has a bunch of these from other developers, so they’ll be very busy for a while. From past experience, I know my reports will be taken seriously and acted on appropriately in a timely manner, if it’s feasible to do so. Your LISP IDE feedback won’t be ignored for decades by Bricsys.

One of the things Torsten Moses mentioned to me that didn’t make it into the published interview was that many developers are very conservative. There’s some truth in that. I’m missing certain keystrokes, for example: 1978-era WordStar Ctrl-Y to delete a line, anyone? It’s a reasonable expectation that as more VLIDE users migrate to BLADE, many requests will come in for VLIDE-like things. I’m told that some of these things will be provided in coming months.

In the meantime, there are things we conservative developers can do to make ourselves feel more at home. One of these is to configure the editor appearance. Here’s the VLIDE editor:

Here’s the BLADE equivalent:

One of the great things about BLADE is how configurable it is, and I know Torsten’s working right now on making it even more so. Configurations are stored in the Registry in a version-independent location (HKCU\Software\Bricsys\BricsCAD\VLispDbgEditor). These can be exported and imported directly or via BLADE, so multiple complete setups and configurations can be managed.

In this post, I’m going to be going through the process of configuring BLADE’s editor appearance to make it look more like VLIDE. I’m not suggesting that’s necessary or even a good idea in most cases, but if you really want to do it, here’s how.

Note: before you do all this manually, please note that at the end of this post I will provide a configuration file that will do it for you.

  1. Start up BricsCAD V18.2 or later and start BLADE using either the BLADE or VLIDE command.
  2. Open a LISP file in BLADE so you can check the effects of the changes we’re going to make.
  3. Use Preferences > Show preference dialog…
  4. In the Preferences & Settings dialog, pick the Styles tab and the Lexer Styles sub-tab.
  5. I’m perfectly happy with Courier New 10, but if you want the VLIDE look, change 1 – Default text to Fixedsys 11.
  6. Click next to 3 – Comment, turn on the Background color toggle and change the Back Color to mid-grey (192,192,192) and Fore Color to dark magenta (128,0,128). You’ll need to specify that RGB value in the lower right corner and use Add to Custom Colors to do this.
  7. Click next to 5 – String and change the Fore Color to magenta (255,0,255).
  8. Click next to 7 – Operator and change the Fore Color to red (255,0,0).
  9. The 8 – Keyword 1 setting should already be blue as in VLIDE. If you want system constants such as T, nil and pi to also be that shade of blue then change 9 – Keyword 2 accordingly. Personally, I prefer a different shade so they stand out. Mid-dark cyan (0,128,192) works well.
  10. I like the pale grey background in BLADE that helps identify the current line. If you don’t, click next to 8 – Caret colour and turn off the Background color toggle.
  11. Switch to the Editor Colors sub-tab, click next to 5 – Selection colour and change the Back Color to a custom mid-blue (0,120,215).
  12. While you’re in the Editor Colors sub-tab, there are a few other non-VLIDE things you can play with. 1 – Brace hilight and 2 – Brace mismatch are dynamically applied to matching and non-matching parentheses respectively. I like my Brace hilight setting to be plum and bold (turn on the Attributes toggle to enable this):

I like my non-matching setting to be white on red (the inverse of a normal parenthesis so it shows up):

Changing all that should give you something that looks like this. Familiar enough?
There are several things in the above image that might be unfamiliar but which I suggest you leave turned on because they’re useful. If you really insist, here are the locations for these settings in the Preferences & Settings dialog:

  1. Line numbers  – View > Margins, Show line number margin
  2. Marker margin – View > Margins, Show marker margin. If this is turned off, bookmarks show up using the settings under Styles > Editor Colors > 13 – Bookmark marker.
  3. Edge marker (that vertical line on the right indicating 80 character width) – View > Edge marker > Type, No background.
  4. Indentation guides (those vertical lines that show you what your code is lining up with) – Tabs and EOL > Indentation, Show indentation guides.
  5. Code folding margin (the margin on the left that allows you to collapse functions, etc. – Folding and Wrapping > Show code folding margin.

Unlike VLIDE, the default in BLADE is to use spaces for indentation, not tabs. As I don’t know of any LISP developer who uses tabs except by accident, this is a much more sensible default. But if you really want to use tabs, turn it on using Preferences > Use tabs and set the width to the VLIDE default of 8 in Preferences > Set tab width.

If you’ve left opening parentheses on previous lines and have indented the following code as usual, then as you go on to finish off the code with closing parentheses, in BLADE a single backspace will take you back your indent width (2 spaces by default) rather than a single space as in VLIDE. If your coding finger can’t get used to this keystroke-saving feature, you can turn this off with Preferences > Backspace unindents.

Having done all that, and having arranged the rest of the interface to your needs (overall window size, pane and field widths, etc.), make sure you save it! It’s as simple as Preferences > Save preferences, but it’s not done automatically. If you want to keep a safe copy of your settings, you can do so with Preferences > Save preferences to file. This simply exports the relevant part of the registry to a .reg file of your choice. This is a text file you can hack about with at your leisure (using BLADE if you like!), and you can even make files that represent subsets of your preferences.

For example, I’ve removed all but the style settings from a .reg file I exported. I’ve uploaded it renamed as a .txt file because .reg files are considered dangerous by browsers, etc.

If you want to use this to give BLADE that old familiar VLIDE look, here are the steps.

  1. Download SteveVLIDE-likeBLADEStyleSettings.reg.txt.
  2. Rename the file to remove the .txt extension so it becomes SteveVLIDE-likeBLADEStyleSettings.reg.
  3. In BLADE, use Preferences > Load Config from File
  4. Close BLADE and BricsCAD.
  5. Restart BricsCAD and BLADE.

That should do it. Happy BLADEwork!

Guest post (BlackBox) – Why every click counts

With a bit of tongue in cheek, “This is not only my first guest post on [blog nauseam], it’s also my first guest post on any blog.” Thanks, Steve!

I get to write about one of my favorite AutoCAD features, and share a short personal story.

Yesterday I read Frank Mayfield’s article on time-sensitive Right Click, which made me recall an opportunity to help a new user on a design task the other day. I led them through an approach to mitigate a design issue, noticed they weren’t using time-sensitive Right Click, and asked them why?

User: Why not?

Me: Fair question; because it’s extra clicks.

User: It’s just a few extra clicks.

Me: Correct; every click counts.

User: Yeah, but it only takes a few seconds.

Me: Correct; how many seconds? Do the same task each way and time it.

User: <Does the task each way>… It only takes an extra 6 seconds.

Me: Good. Now extrapolate that; how many times a day do you do this?

User: Oh, all the time! Haha Hundreds of times a day.

Me: Okay, call it 100, because you won’t do that everyday.

User: 6 secs, 100 times a day, is 600 secs, that’s only 10 mins per day.

Me: Correct; extrapolate that over a year: 5 days, 50 weeks.

User: <Does the math>… Holy crap! 2500 mins? 41.7 hrs? That’s more than a week!

Me: Correct; you just cost the owner a week of otherwise billable time in extra right clicks. Get it now?

User: I get it now.

Me: I know.  <Smiles and walks away>  (<— Yes, I smile! A lot actually)

The user has since opted for the more efficient method on their own, and demonstrated this mindfulness for detail in other areas as well.

I show them the trade-offs and let them choose for themselves.

Accountability makes us better, more capable. Owning our decisions and learning from missteps earns respect. Only then do we see what a real team can do. #GetAfterIt

How to sign your LISP files

This post follows on from Why digitally sign your LISP files? and How to obtain a digital signature to sign your LISP files.

In the first post, I explained why you might want to digitally sign your LISP files. In the second, I explained how to obtain and install a digital signature. This third and final post in the series assumes you have done all that and now want to sign your files. There are two methods available to you, using a dialog box or command-line interface.

Signing LISP using the AcSignApply.exe dialog box

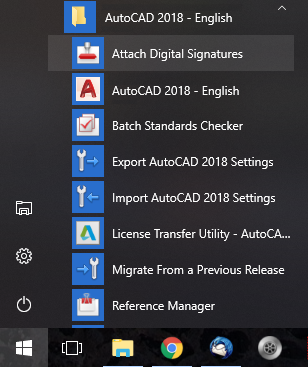
Autodesk has provided a utility called Attach Digital Signatures for years. This was provided to sign drawings, zip files, etc., but the ability to sign LISP files was added in AutoCAD 2016. Don’t go using the 2015 version or you’ll have a very frustrating time! You can invoke this utility using the Windows Start Menu:

You can also make your own desktop shortcut if you like. The executable is stored at (XXXX is your AutoCAD release number):

C:\Program Files\Autodesk\AutoCAD XXXX\AcSignApply.exe

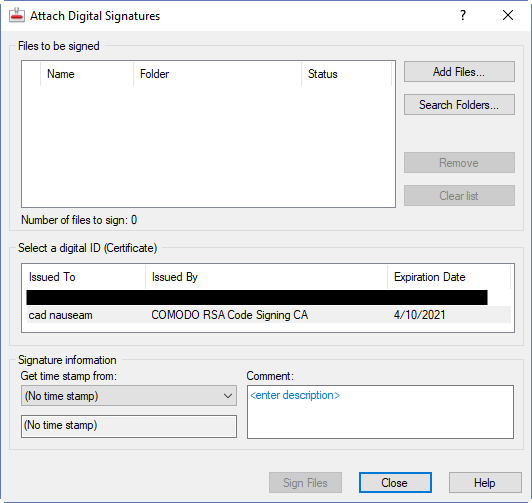
AutoCAD doesn’t need to be running when you start the application. Here’s the interface:

Half way down, there is a list of code signing certificates that you can use. You should see the one you obtained and installed earlier in this list. If you don’t see it listed it may not have been installed correctly. It’s possible to install a public key version of a certificate and see it listed in the Windows Certificate Manager, but that won’t help you sign code. You need to install the private key version in order to be able to sign things. If you do the wrong kind of export from your browser, or if you use the wrong browser to obtain and export the certificate, you may have installed the public key version. In such a case, you will need to contact the certificate provider for help. I have found that the online chat help provided by Comodo is excellent in such cases. Yes, I know this because I got it wrong the first time!

Assuming your certificate is visible, click on that line to select it. You can add files to the pane at the top left using the buttons on the right side or by simply dragging and dropping files onto the pane from Explorer. But wait! Before you do that, make sure you have a safe unsigned copy of all your files. Applying the signatures is a modification process; you are left with only the signed version of the files.

LISP files with the LSP, MNL, FAS, or VLX file extensions can be selected and dragged into the pane. As mentioned in the first post, there’s a bug in the original iterations of AutoCAD 2016 and AutoCAD 2018 that prevents signed VLX files from working, so I would advise against creating them. If you need to distribute signed DCL-based code and don’t want the LISP source visible, you will need to provide a signed FAS instead, along with a DCL file that’s either provided alongside the FAS or created on the fly by your code. Yes, this is a pain.

Note that at the time of writing, you can’t sign CUI, CUIx, DVB, JS, PGP and SCR files.

Once you have selected the certificate to use and the files to sign, select a source for the time stamp and enter a description in the Comment box (optional). Pick the Sign Files button and you’re done.

Signing LISP using the AcSignTool.exe command-line utility

This utility isn’t provided with AutoCAD, but you can download it here. It doesn’t require AutoCAD, which means you can sign LISP files even if you don’t have a copy of AutoCAD 2016 or later.

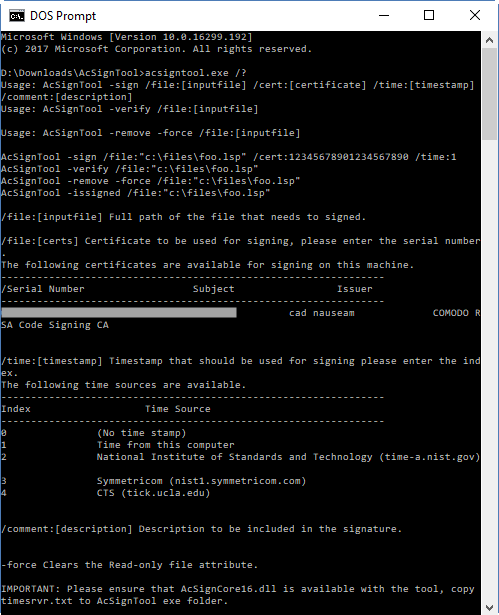
Once you have downloaded and unzipped the file, place the files somewhere handy. If you make a shortcut to cmd.exe that starts in that location, you can run this command to see all the options:

acsigntool.exe /?

Usage is usually as follows:

AcSignTool -sign /file:[inputfile] /cert:[certificate] /time:[timestamp] /comment:[description]

Here’s an example:

AcSignTool -sign /file:"X:\ToSign\MyCode.lsp" /cert:abcdef1234567890 /time:1 /comment:Hello

The resultant file should be the same as with the dialog box interface. If it’s a raw LISP file, a large comment like this will be placed at the bottom of the file:

;;;-----BEGIN-SIGNATURE-----
;;; /gcAADCCB/oGCSqGSIb3DQEHAqCCB+swggfnAgEBMQ8wDQYJKoZIhvcNAQELBQAw
;;; IE1hbmNoZXN0ZXIxEDAOBgNVBAcTB1NhbGZvcmQxGjAYBgNVBAoTEUNPTU9ETyBD
;;; CwYJKoZIhvcNAQcBoIIFQzCCBT8wggQnoAMCAQICEQCyNMZT2aa05avqeC3j+F3p
;;; YQBuAGQAYQByAGQAcwAgAGEAbgBkACAAVABlAGMAaABuAG8AbABvAGcAeQAgACgA
;;; MA0GCSqGSIb3DQEBCwUAMH0xCzAJBgNVBAYTAkdCMRswGQYDVQQIExJHcmVhdGVy
;;; QSBMaW1pdGVkMSMwIQYDVQQDExpDT01PRE8gUlNBIENvZGUgU2lnbmluZyBDQTAe
;;; bnB31gkc9o/M8YjPdGVjQG0VS96RVf/WtkmGugV2n1Fv4wWXBLA7n410yglqSZh9
;;; NOK2Ya1KFx4trccIHV1oAFN+BCKzSf6J/HdVkmCcy4TEPcrxSzZsi//slm2o9EHl
;;; mwdm6Quhw1wMT8+iRmJNO4ofwuKfBwyE28ZIK4q+zorJPNwiK2o43CmNJViU5SQD
;;; M9ImVtHTTtdAR1Iln+wEtg/4xgwj5KWuxoUJ22OJ/K0A8IcnxqGBujCBtwYDVR0O
;;; Fw0xNzEwMDQwMDAwMDBaFw0yMTEwMDQyMzU5NTlaMIGAMQswCQYDVQQGEwJBVTEN
;;; MAsGA1UEEQwENjE1NTELMAkGA1UECAwCV0ExEjAQBgNVBAcMCVdpbGxldHRvbjEV
;;; A1UdHwQ8MDowOKA2oDSGMmh0dHA6Ly9jcmwuY29tb2RvY2EuY29tL0NPTU9ET1JT
;;; QUNvZGVTaWduaW5nQ0EuY3JsMHQGCCsGAQUFBwEBBGgwZjA+BggrBgEFBQcwAoYy
;;; aHR0cDovL2NydC5jb21vZG9jYS5jb20vQ09NT0RPUlNBQ29kZVNpZ25pbmdDQS5j
;;; MYGvBIGsOAAyADsAMgAvADEAMAAvADIAMAAxADgALwA4AC8AMgA2AC8AMQA3AC8A
;;; TgBhAHQAaQBvAG4AYQBsACAASQBuAHMAdABpAHQAdQB0AGUAIABvAGYAIABTAHQA
;;; dABpAG0AZQAtAGEALgBuAGkAcwB0AC4AZwBvAHYAKQAAAA==
;;; -----END-SIGNATURE-----

Because it’s a comment, it will be ignored by AutoCAD releases prior to 2016, and by other AutoLISP-compatible CAD applications such as BricsCAD and ZWCAD.

References:
Signing your application modules for AutoCAD 2016 – Part 1 – Kean Walmsley
Signing your application modules for AutoCAD 2016 – Part 2 – including various other references
To Digitally Sign an AutoLISP File – Autodesk Knowledgebase article

How to obtain a digital signature to sign your LISP files

In an earlier post, I explained why you might want to digitally sign your LISP files. If you decide to go ahead with that, then this post explains how you can obtain and install the digital signature you will need to sign your files. This is the most difficult part of the process and it involves spending money.

Getting a digital signature

Although you can make your own digital signature (there’s an Autodesk Knowledgebase article describing the process), there’s little point in doing this. You can sign your files, sure, but that signature won’t be seen as trusted by software that checks for it. Anybody can create a signature like that, including one that impersonates you, and it doesn’t prove anything. The only purpose for such a home-made signature would be to test the methods you’ll be using to apply a proper trusted signature later.

Edit: if you do want to make your own signature, BlackBox informs me that the MakeCert tool in the Windows SDK mentioned in the Knowledgebase article is deprecated. He suggests using this PowerShell Cmdlet instead.

You’re going to need a signature that is trusted. That means you’re going to have to pay somebody trustworthy to trust you. There are a set of certifying authorities, trusted by Microsoft, Autodesk, etc. who can issue code signing certificates to companies and people. You need to prove who you are to one of those authorities and pay them to certify that you are who you say you are. So before you start, make sure you or your business are visible in terms of directory listings, publicly visible phone numbers, etc. If you are representing a company asking for a certificate, you can expect to be asked to produce evidence that you really represent that company. You can expect to confirm that your email and phone number are really under your control.

You only need to do this once a year, or even once every several years if you pay in advance. You might find that the evidence you need to provide changes at renewal time; for example a Yellow Pages listing that was OK in 2015 was no longer accepted when I renewed in 2017, so I had to register my business with another listing.

In my search for a certifying authority, I found that K Software, a reseller for Comodo, was the cheapest source for a code signing certificate, see here. An OV certificate will be fine for signing LISP.

K Software takes your money (USD $67 to $84 a year depending on the length of time you need), gets Comodo to provide the certificate, and provides a handy tool (KSign) that allows you to simply apply the certificate to various files without some of the messing about that’s otherwise required. It’s not useful for LISP files, though. Comodo also provides the support, and I’m happy to report that in my experience their customer service is excellent.

Note: it’s important that you pay close attention to the instructions when applying for your certificate. For example, the browser you use to apply for the certificate is vital. Choose one that’s suggested (e.g. Firefox) and which you expect to use later to obtain the certificate.

Installing a digital signature

Once your evidence is accepted and your payment has gone through, you will be sent an email with a special code, allowing you to obtain the certificate. It’s important that you’re using the same browser on the same computer that you used when applying for the certificate.

Once you click the link and obtain the certificate, you’ll want to export it. In Firefox 58.0, use Options > Privacy & Security and scroll to the bottom to see View Certificates. Select the certificate and pick Export. This will create a .P12 file that you can back up and install on this or another computer. To install the certificate, double-click the .P12 file and follow the prompts to assign it to the current user in the default location (Personal).

That’s it. You should now have a certificate installed that you will be able to use to sign LISP and other files. To check this, start the Windows Certificate Manager (C:\Windows\System32\certmgr.msc). Have a look in Current User > Personal > Certificates and you should find your newly installed certificate.

The next post in this series will explain how to apply this digital signature to your LISP files. That’s the easy bit.

Why digitally sign your LISP files?

After I mentioned in an earlier post that I had digitally signed the sample LISP file I had provided, this generated some interest. In this post, I’ll explain why you might want to sign your LISP files. In a later post, I’ll explain how to do it.

These days it is standard practice for developers to digitally sign their code. Operating systems and applications are displaying increasingly scary warnings when coming across unsigned code. Here is an example of the sort of message you get when you load an unsigned LISP file into AutoCAD from a location that has not been explicitly configured as a trusted location:

If you’re a CAD Manager dealing with your own internal code, it’s not too onerous to configure AutoCAD in Options > Files such that a folder is trusted by AutoCAD and place your code in there. The folder should be read-only; if it isn’t, AutoCAD warns you when you try to configure it. If you do this, the scary warnings don’t appear to bother and confuse your users, even if your code is unsigned.

Another way a CAD Manager can avoid the warnings is to set the SECURELOAD system variable to 0. That’s generally not recommended because it turns off AutoCAD’s security features. While you’ll probably get away with this, there’s always a chance that a user will load some malware and then you’ll have to explain yourself to management.

If you’re not just using your code internally and it’s going to be used by other parties, then you’re not going to have that level of control over the user environment. In recent AutoCADs it’s possible to set up the installation deployment such that users can’t turn off the security settings. If the CAD Manager at the location using your code has done this, your potential users are going to be presented with unprofessional-looking scary warnings.

If you sign your code, users might still get a warning, but it’s less scary. It identifies you as the verified source of the code so they will have more confidence in picking the Always Load button. Once they’ve done this, other signed code of yours will be automatically trusted.

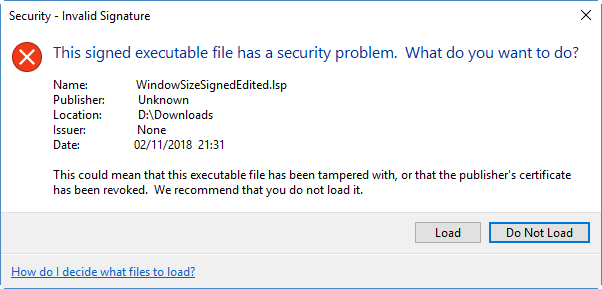
There’s another important reason you might want to sign your code, and that’s protection against other people’s modification of your code. If somebody edits your LSP file and then gives it to someone who tries to load it, the user is presented with an even scarier warning:

Note that this warning no longer has your name on it. This means it’s possible to protect yourself from people (internal or external) who well-meaningly hack about with your code and then try to blame you when it goes wrong. It also gives a level of protection against your code being infected by malware.

Note that all of the above only applies to AutoCAD 2016 and later. AutoCAD 2014 introduced some LISP loading security measures, but the signature stuff came a couple of releases later. Earlier AutoCAD releases, along with compatibles such as BricsCAD and ZWCAD, will just ignore the digital signature. It’s just a comment in the code as far as they’re concerned.

LISP files with the LSP, MNL, FAS, or VLX file extensions can be digitally signed. There’s a bug in the original iterations of AutoCAD 2016 and AutoCAD 2018 that prevents signed VLX files from working. This was patched later in both releases (2016 SP1 and 2018.0.2), but if you’re distributing your code externally there’s always a chance that your VLX might end up in the hands of somebody using a broken release. Also, VLX files that are digitally signed cannot be loaded into AutoCAD 2015 and earlier, broken or not. You should bear that in mind before distributing signed VLX files. I don’t do it and would advise against it. Thanks, Autodesk.

Given this information, if you decide that signing your LISP is a good idea, watch this space for information on how to do it.

Setting your application or document window size using LISP

I intend to produce a few videos containing tips, tutorials, product comparisons and the like. I’ve set up a cad nauseam YouTube channel, but don’t bother visiting it yet because it’s empty.

One of the things I need to do for these videos make sure I’m capturing the screen at an appropriate resolution. I knocked up a bit of Visual LISP to take care of this task quickly and accurately, and you might as well have it. It’s a simple routine that allows you to accurately size either the main AutoCAD application window or the current document window (drawing area) within the main window.

The file is WindowSize.lsp. It should work in all full AutoCAD releases (not counting LT and AutoCAD for Mac) and AutoCAD-based verticals from 2000 on.

It works in recent BricsCAD releases (except the free and LISPless BricsCAD Shape). I’ve only tested it in Windows, but it should also work in the Mac and Linux versions due to the high degree of LISP compatibility provided even across platforms. It also works in ZWCAD 2018 for the main application window, but don’t use it on the document window because that doesn’t work.

Download it, put it in a location of your choice and load it into your CAD application (for example by dragging and dropping it from Explorer onto the drawing window).

Note: In AutoCAD 2014 and later, loading any LISP or other executable file may result in a warning depending on the release, the security settings, whether the file is located in one of AutoCAD’s trusted locations, and whether the file is digitally signed. I’ve digitally signed the file to reduce the incidence of warnings, but you could still see something like this:

The verified publisher should be cad nauseam as shown above. If you pick Always Load then you shouldn’t see the warning again for this file or any others signed by cad nauseam. Feel free to edit the file for your own needs, but if you do the signature will become invalid and you’ll be warned again when loading the file.

Once it’s loaded, enter the command WindowSize. The prompt sequence goes like this:

Command: WINDOWSIZE
Window to size [Application/Document] :
Width in pixels <1280>:
Height in pixels <720>:

Now, back to work on the first of those videos.

Tip: what to do when your text becomes empty rectangles

Dear person who used the search terms “writing has become empty rectangle in cad” and “autocad text has become an empty rectangle” on this blog, I suspect you probably have a drawing where QTEXT has been turned on. To fix this, enter QTEXT at the command prompt, set it to OFF, and if the problem doesn’t go away by itself then issue the REGENALL command.

Pedantic note: the command name is QTEXT, but this controls a system variable called QTEXTMODE. QTEXT OFF is equivalent to both SETVAR QTEXTMODE 0 and just QTEXTMODE 0. In LISP it would be (setvar “QTEXTMODE” 0).

This tip applies to all AutoCAD releases and variants you’re likely to run. Because BricsCAD has a high degree of command-line compatibility with AutoCAD, it applies to BricsCAD too. The same may apply to other AutoCAD-compatible applications.

Tip – making your 3D controller work sensibly in BricsCAD

This tip applies to BricsCAD V14 to V18 inclusive, and possibly other versions too.

BricsCAD automatically works with a 3D “mouse” (e.g. 3DConnexion SpaceNavigator controller), and due to the generally excellent performance of BricsCAD in 3D, it works very smoothly and is a real productivity boon for 3D work. If you don’t already have one and you work in 3D, it’s well worth spending a fraction of the money you saved by switching to BricsCAD to get hold of one.

Unfortunately, the way BricsCAD reacts to use of this device fails to lock the horizon by default. This means it does not keep the vertical axis vertical, so unless you have an exceptionally light and skilled touch, you will soon have your model skewed, upside down and/or flopping around all over the place.

OK, this may be a silly default setting, but how do you change it? Read on.

Method 1

Press the left button on your controller. If you’re lucky, you will see the 3dxWare Panel. (I’m not seeing it in V18 so maybe I need a driver update). Use the Button Configuration tab and change it from “All Applications” to “BricsCAD”, then it should show as:

  • L: BricsCAD Default Menu
  • R: Fit

Picking the controller’s left button in BricsCAD after doing this brings up a context menu containing a Lock Horizon option.


Once you turn this on, the controller will work as expected.

Method 2

If you don’t have those options available to you when you pick the controller’s left button and you’re comfortable messing around in the Registry (the usual caveats apply here), you can fix it up.

First close BricsCAD. Now start REGEDIT and search for the 3dMouseMenu section, e.g. HKEY_CURRENT_USER\Software\Bricsys\BricsCAD\V18x64\en_US\Profiles\3D Modeling\3dMouseMenu. Under there is a LockHorizon value: change that from 0 to 1. Next time you start BricsCAD, the controller should work as expected. If therre are multiple user profiles, you will need to repeat this process for each profile.

Method 3

If you don’t have rights to use REGEDIT or you don’t feel comfortable doing so, you can achieve the same result by exporting and importing a user profile, with a little bit of text editing inbetween.

  • Close BricsCAD
  • Start the User Profile Manager (e.g. Start > All Programs > Bricsys > BricsCAD V18 (x64) en_US > V18×64 User Profile Manager
  • Choose a user profile and export it
  • Manually edit the resultant .arg using a text editor (e.g. Notepad) and change the appropriate line under 3dMouseMenu to “LockHorizon”=dword:00000001
  • If that section doesn’t exist, add it as follows (ensuring you use the right version information, e.g. V16x64 in place of V18x64):
    [HKEY_CURRENT_USER\Software\Bricsys\BricsCAD\V18x64\en_US\Profiles\3D Modeling\3dMouseMenu]
    "Rotate"=dword:00000001
    "PanZoom"=dword:00000001
    "LockHorizon"=dword:00000001
    "RotCenterModeAuto"=dword:00000001
    "RotCenterModeSelected"=dword:00000001
    "Speed"=dword:00000001
    "3dMouseMode"=dword:00000000
    "RotCenterVis"=dword:00000002
  • Import the edited .arg – you’ll have to provide a different name to any existing profile. Don’t worry, you can rename and delete profiles later as required.
  • Set that profile current
  • Start BricsCAD

You can do the same from within BricsCAD using Tools > User Profile Manager, but as you need to restart BricsCAD anyway before the change takes effect, you may as well do the above.

BricsCAD documentation – a tale of three systems – part 3

In this third post in what was supposed to be a two-part series, I have more to say about the BricsCAD documentation system. See here for part 1 and here for part 2.

Developer Help – Addendum

In this comment from Bricsys API person Torsten Moses, he informed me about the availability of the Lisp Developer Support Package (LDSP) in the Bricsys Application Catalog. As always, when presented with new evidence I am prepared to re-examine my position on anything. Therefore, I will now further discuss the BricsCAD developer documentation.

The first thing to mention is that the existence of the LDSP package is not obvious. To somebody who uses BricsCAD as-provided and as goes burrowing down through the Help system looking for information, that system is still broken. The documentation as presented to the user remains sub-standard, exactly as described in part 2.

Assuming you know of the existence of LDSP, how do you go about using it? Here are the steps:

  • Go to the Bricsys Application Catalog site, click in the search field and start typing LDSP (you don’t need to hit Enter).
  • The link to the Lisp Developer Support Package (LDSP) will appear: click that.
  • Enter your email address, accept the privacy agreement and pick Download. (Note in passing that this is actually published by Torsten’s own company, not Bricsys).

  • If you’re already a registered Bricsys user (you will be if you’re evaluating it), the download will start. If not, you’ll be expected to register (free):

  • Once you’re registered, the download results in a 12 MB file called Lisp Developer Support Package.rar (RAR is a ZIP-like format).

Any recent commercial ZIP utility (e.g. WinZip) will open RAR files and there are a variety of freeware/adware/shareware utilities available to do likewise. For example, RAR Opener in the Windows Store will present itself as the first option in Windows 10. But it goes without saying that going off in a hunt for utilities wouldn’t be on anyone’s expected to-do list when just looking for product help. A bunch of people would give up here, if not earlier.

I went through with installing RAR Opener, but when I attempted to open the LDSP file I saw this:

Oh, and a handful of empty folders were produced. Is there an email waiting for me at work with the password (my Bricsys registration email is at work but I’m at home)? Am I really supposed to have a password to open this RAR? If so, why wasn’t I prompted for one? RAR Opener doesn’t present me with that option anywhere I can see. Is the download corrupt? Does it refuse to work on a Sunday? I have no idea.

At this stage, many more would give up. How many prospective customers would be filtered out by this experience? There’s no way of knowing. However, I’m made of sterner stuff and persevered with downloading and installing another app from the Windows Store. 9 zip did the job and uncompressed the file, no password required.

Yes, the RAR Opener problem I had above isn’t a Bricsys problem directly. But it is indirectly, because the file I was given to deal with won’t open by default in Windows, where the vast majority of BricsCAD users will be working. It’s a level of obfuscation that you can get away with when dealing with cellar-dwelling geeks handling obscure pieces of open source software. It’s not appropriate for customer-facing documentation in a mainstream CAD application. Yes, even developer documentation, because with CAD applications like AutoCAD and BricsCAD, most of the developers are customers/users/managers, not people trying to sell utilities.

Once you manage to get the file uncompressed (it becomes 41 MB), there are three help systems provided in there (CHM, PDF, HTML). That’s excellent, and conforms nicely with the Bricsys philosophy of providing customers with choice. I was unable to find any broken links. However, even in the LDSP, standard AutoLISP functions are undocumented. So I still couldn’t find the (entget) help I was looking for in part 2:

According to Torsten:

…the standard AutoLISP functions like (entget) are not documented, as there are plenty docs on the web for this; but we document any extension beyond AutoLISP standard, even for the standard functions.

Sorry, but while “we don’t have that information but you can Google it” might have been an acceptable answer for a cheap AutoCAD clone’s API documentation ten years ago, that’s not where BricsCAD is today and most definitely where Bricsys wants it to be in future. Just two days ago, Bricsys CEO Erik De Keyser sat across a table from me and told me that BricsCAD isn’t intended as merely an AutoCAD alternative, but must go well beyond that in order to prosper. He’s right. The BricsCAD developer documentation today is not compatible with that vision. I know it’s that way for historical reasons, but we’re now at a different point in the historical timeline.

Conclusion – Addendum

My conclusion from Part 2 remains valid, despite the existence of LDSP. Both Autodesk and Bricsys have work to do. Downloading LDSP will help with some of the BricsCAD developer documentation failings but leaves plenty behind. It also provides its own set of unfortunate challenges.

This isn’t just a technical and ease-of-use failing, it’s a marketing one. That’s because it acts as a stumbling block to conversion of AutoCAD sites to BricsCAD. Disaffected AutoCAD power users in small sites and CAD Managers from large sites are right now taking tentative steps to evaluate the suitability of BricsCAD to replace AutoCAD in their complex LISP-heavy custom environments. They’ll want to know what’s the same and what’s different so they can estimate the effort and cost involved in the transition before getting in too deep. I know this, because I’ve done it myself. The first thing they will come across in their search is disjointed, very inconvenient and incomplete. It presents a less-than-professional image.

Some potential customers, like me, will persevere and discover that the quality of the developer tools implementation far exceeds the expectation generated by the documentation. Others will give up well before they reach that stage, and that’s a shame.

Hot tip for Autodesk

Hey Autodesk high-ups, I’m sorry you’ve been having so much trouble persuading your customers to throw away their perpetual licenses and throw themselves on your perpetual mercy. It’s clearly difficult to persuade technical types to do dumb things like rent your software at enormous and ever-increasing prices. I feel for you. But there’s an answer.

Find dumber customers.

Lots of them. And fast, before the stock market notices that you’re no Adobe and we’re not buying it. Sorry, I mean not renting it.

Look no further! Simply buy this company, discard the product when you’re bored with it (you’re very familiar with that process) and get hold of the customer list.

Sell subscription software to those people. They’ll have no idea what they’re renting or why, but that doesn’t matter. They’ll buy anything that’s pretty, hip, now, connected, and preferably organic. They will commit to perpetually shelling out large sums just to keep using it, no matter how poorly it performs. They’re rich and dumber than rocks. All of this makes them ideal customers for you.

If you’re a bit strapped for cash at the moment, just have a word with the investors (including Google) who pumped $120M into an Internet-enabled $700 (sorry, now $400) machine that squeezes expensive pre-squeezed juice out of DRM-protected short-lifespan bags, and manages to do it slower and noisier than you can do it with your bare hands. They’re even dumber than the customers, so squeezing money out of them will be easier than squeezing juice out of a bag when the Wi-Fi’s down.

This is a perfect fit for you, Autodesk. It has everything you need to ensure mission-friendly proactive synergistic compatibility on a going-forward basis. It’s disruptive. It looks good. It’s an overpriced, poorly functioning product. It has on-point (but pointless) compulsory connectivity. It ties users into paying whatever you ask, for ever. And best of all, it connects you to a collection of completely clueless cashed-up customers.

Thanks to @internetofshit on Twitter for making me aware of this and other hilarious Internet of Things (IoT) idiocy. Examples:

Enjoy!

BricsCAD documentation – a tale of three systems – part 2

In this pair of posts, I describe the BricsCAD documentation system. Click here for part 1, where I describe the general Help system and the descriptions in the Settings command.

In this part, I discuss developer documentation and draw my conclusions.

Developer Help

If we count the Settings descriptions as a system, there’s a third documentation system for BricsCAD. The Developer Reference isn’t offline and included in an install like the main Help. Instead, it’s online, just like Autodesk’s default. Unlike Autodesk’s system, it works pretty well.

Being online means the performance suffers, of course, but it’s generally not too bad. It appears quicker than Autodesk’s. A link within the main Help system takes you to the Bricsys Developer Reference which is just accessed using your default browser. Of course, that means your mouse buttons work correctly and you have all other the advantages of whatever functionality is built into your browser.

Hot tip: you can get to a real browser from within the AutoCAD pseudo-browser thing too, by right-clicking on a link and picking Open in Browser. The URL takes a while to mangle and unmangle itself before you get to read any content, but you get there in the end.

Unlike the general Help, the BricsCAD developer Help system isn’t so obviously superior to its AutoCAD equivalent. This is largely thanks to the outstanding efforts of Autodesk’s Lee Ambrosius who has managed to take Autodesk’s pig’s ear of a system and produce perhaps not a silk purse but at least a decent-quality cloth bag. It can’t have been easy.

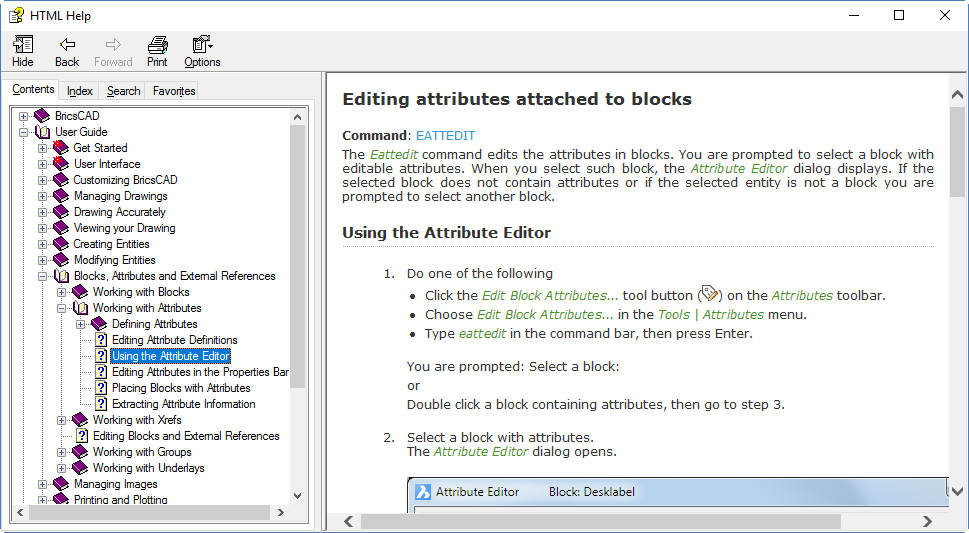
Like the main Help, the BricsCAD online developer reference has a Contents mode with structure:

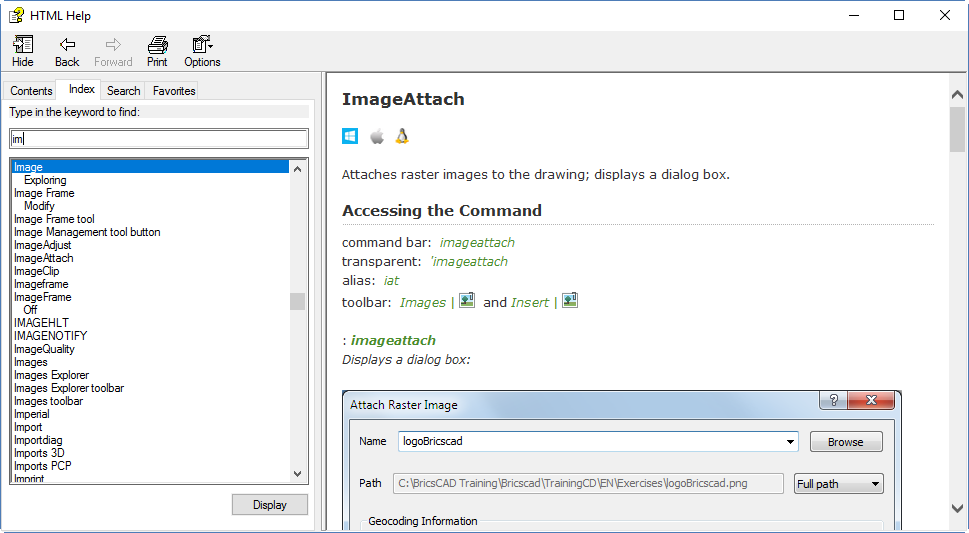
There’s an Index:

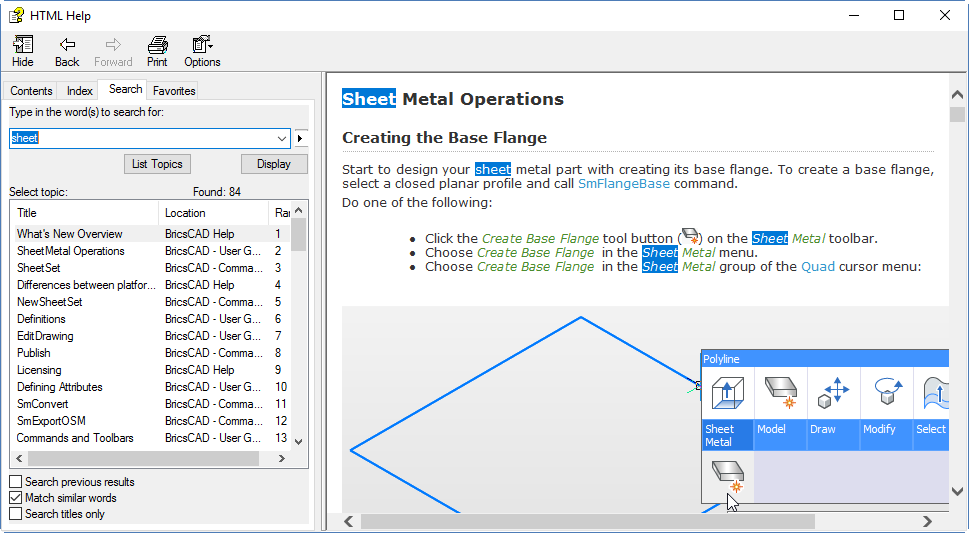
And there’s Search:

As the last image shows, the system contains not only missing information (where’s the (entget) description?) but also broken links; this wasn’t the only 404 I came across. That’s a bit embarrassing, Bricsys. There’s a lot of work to be done yet to bring this up to scratch.

There’s no Favorites section, but of course that’s built into your browser so it would be pointless reproducing that.

Of course, you can’t get context-sensitive help on functions within your LISP code from VLIDE, because BricsCAD has no VLIDE.

Conclusion

The BricsCAD documentation system is notably better than the AutoCAD one in many ways. However, it’s a long way short of perfect. Many aspects need attention, and there are multiple holes to be filled. Sometimes I find myself forced to use AutoCAD’s general documentation system to find out something about a system variable that’s common to both systems. That shouldn’t be necessary.

I’ve hardly mentioned the content of the respective documentation systems, but I must say Autodesk’s content is often superior (thanks, Dieter). But there are exceptions; the BricsCAD descriptions and pictures of various commands and options are better in some cases. For example, try to find out what the various options of the PEdit command do in both systems. With BricsCAD, it’s all laid out on one page and nicely linked.

The AutoCAD command documentation has been pared down too much in places to make each page shorter and simpler, hiding the content beneath sometimes obscure links. It’s possible to find out what the Pedit options do in AutoCAD, but it’s certainly not BricsCAD-easy and I initially gave up after chasing my tail for a while. I went back and found it later, but it took a lucky guess. Giving up after looking through a circular set of links is a common experience with AutoCAD’s Help. There’s a programming concept called mutual recursion, but I don’t want to experience it during a vain search in a Help system, thanks. A visible, navigable structure would help eliminate that issue, but there isn’t one. There needs to be one. Did I mention that already?

With system variables, BricsCAD’s Help is consistently and clearly inferior to AutoCAD’s. The AutoCAD content also tends to be better worded, with the BricsCAD wording being occasionally slightly awkward in a non-native-English-speaking manner. There are also some formatting issues with wide gaps left where the system attempts to expand command descriptions to the right margin and does a poor job of it.

As with AutoCAD, there are many video tutorials available for BricsCAD. I have not considered these in my evaluation but the few I had a look at were pretty good.

Who wins? Nobody. It’s a draw. Both companies need to step up. Autodesk mainly with its awful structure-free system, Bricsys mainly with its incomplete content, particularly for developers. But both companies have work to do in all areas.

BricsCAD documentation – a tale of three systems – part 1

Because of the great similarity between BricsCAD and AutoCAD in terms of commands, variables and most aspects of usage, you would expect the BricsCAD documentation to be about the same too. But it isn’t. Much of the content covers the same areas and due to BricsCAD’s command-line compatibility, there must be a lot in common. But the Help system is very different from Autodesk’s. How so?

In this pair of posts, I describe the BricsCAD documentation system. I assume you’re familiar with the AutoCAD one. In this first part, I describe the general Help system and the descriptions in the Settings command. In part 2, I will discuss developer documentation and draw my conclusions.

General Help

The general Help system in BricsCAD looks a lot like the excellent CHM-based system that AutoCAD had in 2010 and earlier (thanks, Dieter). BricsCAD’s Help is offline by default, included with the standard download and installation, and very fast. Those are great things to have, and AutoCAD lacks them all. But the great thing about the BricsCAD Help system is that it supports different usage patterns, rather than Autodesk’s search-or-nothing method. Rather than telling users that they are expected to use Help in one specific way, Bricsys accommodates their disparate wishes. As usual, the customer-friendly way is the winner.

The BriscCAD system looks a lot more old-fashioned than the AutoCAD one. I don’t care about that. I do care about space-efficiency though, and BricsCAD is the winner there. You can of course resize the dialog and the size of the left pane.

There’s a Contents tab which allows you to navigate the hierarchical structure in which the information is arranged. That’s useful not only when looking for something in particular, but also when using the system as a self-teaching mechanism by working through an area and related topics. AutoCAD completely lacks such a structure.
There’s an Index tab that lists the indexed items in alphabetical order. You can start typing and the indexed items instantly change to reflect what you’ve typed, which is much more efficient than Autodesk’s system. AutoCAD 2018 Help does include an alphabetical list of commands and system variables in both online and offline versions, but it doesn’t give access to all of the topics.
There’s a Search tab that allows you to enter a search term and have several suggestions thrown up. Unlike Autodesk’s system, the suggestions are displayed in a space-efficient manner. Unfortunately, like Autodesk’s search, the suggestions displayed often differ from what you’re after. Even hitting F1 within a command doesn’t take you straight to the page for that command. In PEdit, the F1 visible suggestions don’t include the PEdit command page! It’s there, but needs a scroll down. That really needs work.
There’s also a Favorites tab where you can save and restore any pages you want to go back to.
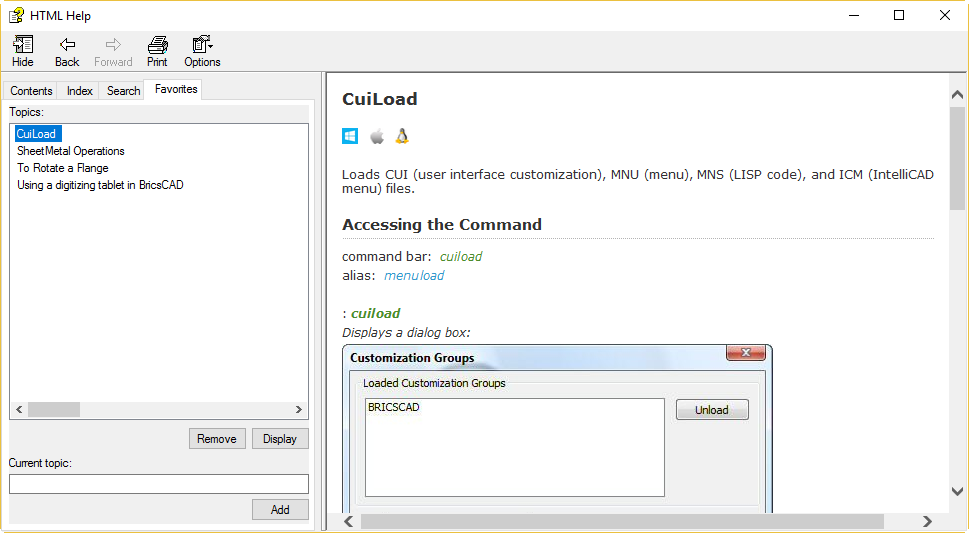
But that hierarchical structure is the big winner. Destroying that structure in the AutoCAD 2011 pseudo-browser Help debacle and leaving it broken for seven further releases has to rank among the silliest self-destructive acts Autodesk has ever performed on AutoCAD. Because Bricsys never made that mistake, its general Help system is superior to AutoCAD’s. Until Autodesk throws away its flat-structure mindset and starts again, it has no hope of catching up to the BricsCAD system.

Oh, and your mouse’s forward and back buttons work in the BricsCAD system. How long have we been nagging Autodesk about that? Seriously, how hard could that be?

It’s not all good, though. As mentioned at the top, the AutoCAD content is generally superior. There are also quite a few holes. Enter a system variable at the command line and hit F1. You would expect to get context-sensitive information about that system variable. You don’t. You’re just taken rather uselessly to the “Welcome to BricsCAD” page. This needs attention to ensure context-sensitive help is available for all commands and system variables.

Fire up Help, pick the Index tab and start typing in a system variable name. In most cases, you’ll find it’s not in the list (e.g. FILEDIA). In cases where a system variable name does appear in the list (e.g. FILLMODE), double-clicking on it doesn’t take you to a description of the system variable. Instead, you will be presented with multiple topics and it’s often not clear which is the system variable description.

Settings Descriptions

For system variables and most other settings, you’re better off avoiding the main Help system altogether. Instead, use the Settings command. This is like Options in AutoCAD but superior, because it’s all there and arranged much more logically. You can navigate a hierarchical structure to find the setting you want, but you can also type part of the setting name or a related word into the search box at the top of the dialog. If that doesn’t take you immediately to the setting you’re after, you can use the up and down arrows to go to the next match. It’s all very quick and efficient.
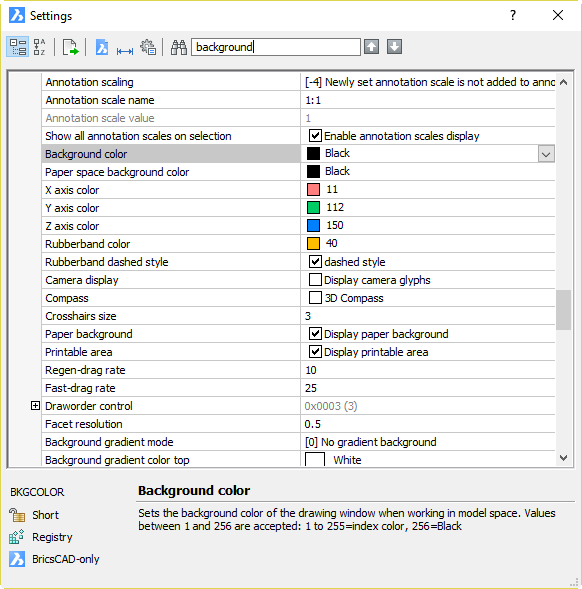
Unlike AutoCAD’s Options, you don’t need to go hunting from tab to tab, visually scanning the dialog for the setting you want, which might be hidden under a button or not there at all. Also far superior to AutoCAD, the descriptions don’t hover over the dialog, obscuring what you’re looking at. Dieter has been hacking the AutoCAD dialog hover-tips down in size for years, but they still annoy the heck out of me until I turn them off.

When you find the setting you’re after, a brief description is displayed at the bottom of the dialog. In most cases, this has just the right amount of information you need without having to read through a whole page. If it doesn’t, in some cases it will tell you the setting name. However, this is missing in many cases.

This is a “could do better” area for Bricsys. Somebody needs to go through these descriptions, fill the holes (not a small job) and make them all consistent. While they are at it, get them to tie up all of the missing context-sensitive loose ends in the main system. Better still, provide a button or other method within Settings to take the user to the appropriate Help page. Currently, pressing F1 within the Settings command will give you useful but generic information about using the dialog. Unfortunately, it will not give you information about the setting you want to check or change. That needs to happen.

Click here for Part 2.

AutoCAD 2018.0.2 arrives

AutoCAD 2018.0.1 is dead, long live 2018.0.2!

Here’s the readme.
Here’s the 64-bit direct link.
Here’s the 32-bit direct link.

This supposedly fixes stuff that 2018.0.1 broke, such as the signed VLX thing. Will this one break other stuff? I guess we’ll find out.

You can still buy Autodesk perpetual licenses in Europe

Yes, you really can still buy Autodesk perpetual licenses in the European Union. You just can’t buy them from Autodesk.

Where can you buy those licenses? From other customers who don’t need them any more. Unlike some jurisdictions, the EU respects the doctrine of first sale for computer software. This means sale of pre-owned software is allowed, and any EULA restrictions attempting to prevent that are invalid. This was established in 2012 by the EU’s highest court, The Court of Justice for the European Union (CJEU) in the case of UsedSoft v Oracle.

Autodesk and all other software vendors in EU countries have to respect that, so the perpetual license remains valid after transfer to the new owner. The previous owner must be able to document the validity of the license and must delete or disable their copy of the software upon transfer.

While I have no personal experience of the transfer process, according to what’s being said in this CGTalk thread*, it’s all very easy. Fill out a form and you’re done. However, I suggest you contact your local Autodesk office for the details. Don’t bother to ask AVA, she doesn’t know.

I’m no EU lawyer, but my reading of the judgement is that Autodesk is not obliged to transfer any maintenance contracts along with the perpetual license (clause 66). It is, however, obliged to consider the software to be upgraded to the original owner’s level under any maintenance arrangements (clause 67). This means the software license will be permanently stuck on the last activated release prior to the sale. Companies with a single license permitting use by 50 users and who want to shed 20 of them can’t split off and sell those 20 (clause 69). Again, check with your local Autodesk office for confirmation.

If you’ve been through this process, please comment on your experiences for the benefit of others.

Software licenses within the EU are valid in all EU countries, so it would appear there is nothing preventing, say, a German buying a used AutoCAD license from the UK, at least until Brexit is complete. It is unlikely that an EU license will be legally valid outside the EU, as outside Europe Autodesk only permits license transfers under certain circumstances described here.

It’s interesting that this market for perpetual licenses exists, but Autodesk has locked itself out of its own market! Indeed, by ending the sale of perpetual licenses, Autodesk has made them a rarer and more valuable commodity.

AutoCAD 2018.0.1 mystery deepens with silent withdrawal

As I mentioned earlier, the release of AutoCAD 2018 was followed almost instantaneously by the first update, 2018.0.1. At the time of writing, there was no official information about this update. Some information was later made available, but questions remained.

Now the update has been silently withdrawn. Go to Autodesk Account > Management > AutoCAD > Downloads > Updates & Add-ons and you will no longer see this:

The infamous Autodesk desktop app also shows no sign of this update. So why has it been withdrawn? Autodesk isn’t saying, but thanks to Jimmy Bergmark, we know that installing the 2018.0.1 update re-introduces a bug from AutoCAD 2016 (pre SP1) where signed VLX files don’t load. This means various 3rd party applications won’t load if the developers have done the Autodesk-recommended right thing by digitally signing their code.

If you’re a developer and want to test your code under the different versions, these direct links still work at the time of writing:

If you’re not sure whether or not you have 2018.0.1 installed, the About command will show you.

You can also check for this under program control by inspecting the system variable _VERNUM. In AutoCAD, it’s “O.49.0.0” before the patch and “O.61.0.0” after. I don’t know about LT, and I don’t know about the situation with verticals. Do they incorporate the 2018.0.1 fixes? How about the VLX bug? Should users who have applied this update uninstall it? Is this going to be done automatically or by Autodesk desktop app? How should users manually revert to the pre-2018.0.1 state if they need to load applications that use signed VLX files?

I think it’s fair to say that Autodesk’s management of this update has been a disaster. This is just one in a long line of AutoCAD update screw-ups going back decades. It proves comprehensively that continuous updates from Autodesk are a non-starter.

Autodesk can’t be trusted avoid breaking things with its updates. It can’t be trusted to effectively communicate about the updates. It can’t be trusted to provide fixes for its broken fixes. It can’t be trusted to provide an automated update mechanism that doesn’t hog your resources or one that works properly.

The AutoCAD 2018 install inflicts the execrable Autodesk desktop app on your systems without asking, which in itself is a betrayal of trust. I recommend you uninstall it immediately after all Autodesk installs. You will need to right-click the app tray icon and use the Exit option before you can uninstall it using Add or Remove Programs.

Autodesk needs your trust to make its continuous update idea work. Autodesk doesn’t have that trust. Autodesk doesn’t come close to deserving it.

Autodesk updates Design Review

Despite the previously announced end-of-active-life for Design Review (Autodesk’s DWF viewer), there is now a new release available. This wasn’t supposed to happen, because we should all now be using cloud-based solutions.

A new version of DWG TrueView was needed to deal with the new DWG 2018 format, and one knock-on effect is that a new Design Review was needed to be compatible with DWG TrueView 2018.  It’s still only 32-bit, so it appears to be a matter of Autodesk just touching it up enough to keep it compatible.

Interestingly, the new Design Review is not called 2018. Here’s where to find it:

On the bloatware theme, if there’s a particular reason this download (421 MB) is over eight times the size of its predecessor (49 MB), it’s not readily apparent.  The installed application is 212 MB, so it’s all a bit mysterious.

The downloaded executable is a WinZip self-extractor. If you’re a CAD Manager, there’s no point in having the unzip happen 100 times for 100 users when it could happen just once, so you’ll want to grab the extracted files and install from those. This installer makes that difficult, but not impossible. If you want to do that, read on. If you’re just installing it once, skip the next two paragraphs.

Running SetupDesignReview.exe (note the lack of version information), the extraction started but I couldn’t find out where it was extracting to. I eventually found it in the folder %Temp%\XXX.tmp, where XXX is a random name, e.g. _AID0D9. This folder gets automatically erased on completion or cancel, so what you need to do is run SetupDesignReview.exe once, wait for the unzipping to finish but don’t go ahead with the install, copy the %Temp%\XXX.tmp folder elsewhere, then cancel the initial installation. You can then run as many installations as you like using the extracted files.

It would be useful to have these things documented. The Installation Help, System Requirements and Readme links in the installer all rather unhelpfully point to a generic Knowledge Network search.

The install proper will uninstall Design Review 2013 without asking, which is antisocial. For example, if you wanted to keep using HP Instant Printing (not supported in the new release), this installation would mess you up. In my case it also threw up an error during that uninstall, although it still seemed to go through with it.

Note there’s no sign of a release number. The only versioning I can find is in Help > About, with a build version of 14.0.0.177. When you run it, you’ll notice that it hasn’t had the UI of Doom treatment, so it looks like a cut-down AutoCAD from a few releases ago. Not a bad thing.

How about the product itself? Seems to work OK. If you go to open something, it will show you DWG files as well as DWF(x) files. What happens if you try to open a DWG file? This.

Everybody familiar with versioning knows you never put “the latest version” on anything because it’s meaningless. I was once told about a Head Drafter in the early CAD days who had special stamps made up to stamp paper plots with THIS IS THE LATEST VERSION OF THIS DRAWING. The above message is about that smart.

What happens when you pick the Learn More button? Nothing. So I learned nothing.

Anything else? Well, on my system, it takes about twice as long to start up this simple DWF viewer than it does to start up a full-blown CAD application. Want to take a guess at which application I mean?

Can’t complain too much. This product is free, Autodesk is still providing it and still making efforts to keep it up to date. Props for that much, at least.

AutoCAD 2018.0.1 mystery partially resolved but questions remain

As I mentioned earlier, the release of AutoCAD 2018 was followed almost instantaneously by the first update, 2018.0.1. At the time of writing, there was no official information about this update. Some information is now available, but more questions have arisen.

If, like me, you don’t/won’t/can’t have Autodesk desktop app running on your systems, the only current official way to get at the download is using Autodesk Account (but read the whole of this post before you go there). That’s also how you get at information about the update. Go to Management > AutoCAD > Downloads > Updates & Add-ons. From there, it’s not obvious how to get the information, but it’s under More options.

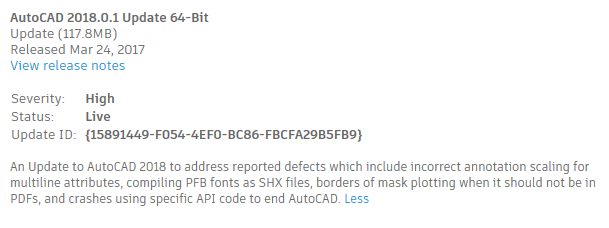
From there, pick View Details. This will show you the following information (after you pick More):

As you can see, the severity is considered high. If you pick View release notes, you can see the readme, or you can go straight to it if you have this direct link. Here are the fixes described in the readme:

  • Occasional crashes when ending an AutoCAD session using specific API code no longer occur.
  • Publishing annotative multiline attributes no longer results in incorrect annotative scaling.
  • PFB fonts can now be compiled successfully as SHX files.
  • The border of a mask is no longer plotted in PDFs when “Lines Merge” is turned on.

Although it would be easy to have a go at Autodesk for shipping a product that needs fixing within hours of release, that wouldn’t be entirely fair. No software is flawless. Stuff happens, and the sooner fixes are provided to resolve that stuff, the better. So I commend Autodesk for getting this fix out quickly.

That doesn’t mean Autodesk is blameless, though. Read on.

First, the way the information about this update was (or wasn’t) disseminated was sub-optimal. It has required too much prodding and guesswork to get to the point we are now, and we’re still not where we should be.

Next, there’s scant information in the readme. I don’t see any documented way of including this fix in a deployment, for example. That means it’s not possible to create a one-step automated install without resorting to trickery.

Further, this update isn’t available on the main Autodesk site. It needs to be. Even if you know the version number to look for, a search at autodesk.com will come up blank:

Using the Autodesk Knowledge Network Download Finder won’t help, either:

Fortunately, these direct links appear to work:

This brings me to my fourth point of criticism. See that the 64-bit executable has “r2” on it? The one I downloaded on 23 March doesn’t. The 64-bit executables are similar in size to each other but the binary content is different. The 32-bit 2018.0.1 has a date of 22 March and the 64-bit 2018.0.1 r2 has a date of 24 March. So it looks like the patch has been patched, at least for 64-bit users.

Information on this patch-patch is non-existent. Should somebody who downloaded and applied the 64-bit 2018.0.1, download and apply 2018.0.1 r2? Will that work? Do they need to uninstall 2018.0.1 first? How should they do that? Will the 32-bit 2018.0.1 also be updated to r2? Should those users hang off a few days to avoid wasting time or go ahead with what’s there now?

Over to you, Autodesk.